Configure VXLAN with Ansible Part 1
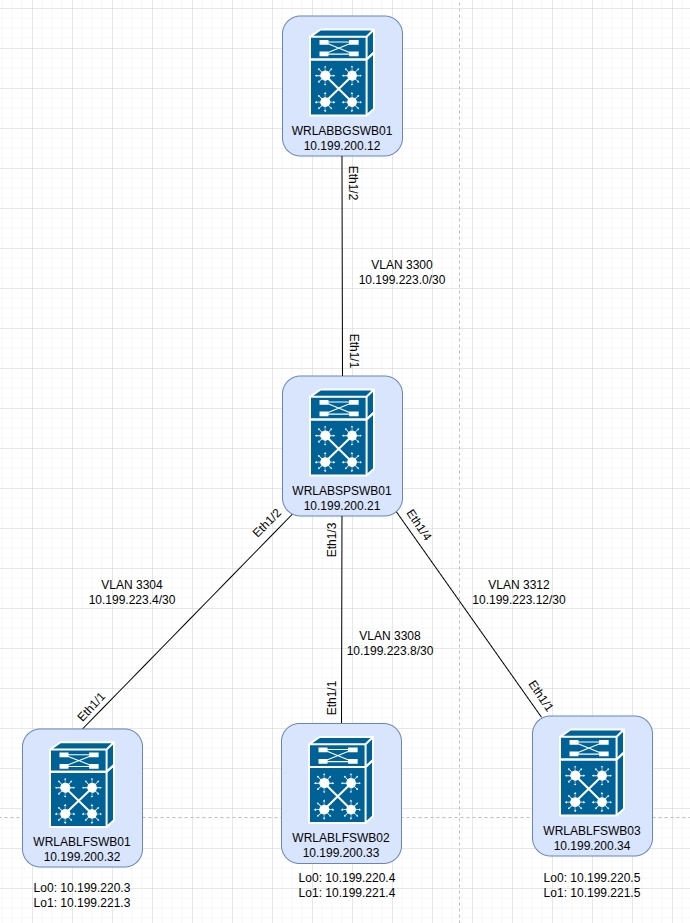
It's been quite a while since I've had time to lab anything but I finally managed to get back into it and decided why not do a bit more on Ansible and VXLAN so, I setup another micro PC in my home lab so that I could build out a second VXLAN "DC" of Virtual N9K switches. My goal with this one is to configure the entire thing with Ansible outside of the standard configuration that is applied using POAP. For the second "DC", I'm going to use the same spine and leaf design with a single spine switch and three leaf switches. There will also be a border leaf/gateway switch that will be used for all inter-fabric/external routing as my plan is to eventually connect the other "DC" to this one and have a multi-site fabric but that's for another day. This will be a multi part series with the first part being the initial Ansible inventory setup and creating a role that applies some base configuration settings. The second part will be the VXLAN underlay configuration and the third part will be the VXLAN overlay configuration. The below topology is the design for this Ansible VXLAN lab.
As i've already gone through how to deploy the virtual NX-OS switches in previous posts, I won't cover that here and will only cover what was required to get Ansible to do all the configuration for me. This took me WAAAAY longer than i'd like to admit but I got there in the end. To begin, I'm going to assume that you have basic management access to your NX-OS switches and already know how to get Ansible to either use credentials to SSH to your switches, or have configured SSH keys so that you can run your scripts without a username and password which is what i've done.
To get started, let's create the required inventory file with the details of your virtual switches and certain variables required to be able to use Ansible. To do that, create/edit your inventory.yml file and add the details for your NX-OS switches. If you're following this lab, you will also need to create several groups for your devices. These groups are used to run the required tasks that need to be run depending on the switch function. Below is an example of the inventory.yml file that I used which includes the required groups for this lab. This is only one example of how to setup an inventory file so you don't have to explicitly follow this format.
all:
  hosts:
    wrlablfswb01:
      ansible_host: 10.199.200.32
    wrlablfswb02:
      ansible_host: 10.199.200.33
    wrlablfswb03:
      ansible_host: 10.199.200.34
    wrlabbgwswb01:
      ansible_host: 10.199.200.12
    wrlabspswb01:
      ansible_host: 10.199.200.21
  vars:
    ansible_connection: ansible.netcommon.network_cli
    ansible_network_os: cisco.nxos.nxos
    ansible_user: ansibleuser # This is the username used to SSH

  children:
    dcb_leafs:
      hosts:
        wrlablfswb01:
        wrlablfswb02:
        wrlablfswb03:

    dcb_switches:
      hosts:
        wrlabbgwswb01:
        wrlabspswb01:
        wrlablfswb01:
        wrlablfswb02:
        wrlablfswb03:

    dcb_spine:
      hosts:
        wrlabspswb01:

    dcb_bgw:
      hosts:
        wrlabbgwswb01:

network_lab:
  children:
    leafs:
    spines:
    bordergw:
Once you have your main inventory file created, there are a number of variables that need to be set for each host. The following inventory files should be created in your host_vars directory and modified to suit your topology. Below are examples of the leaf switch host var files for this lab scenario.
In your leaf switch inventory file, if you're following this guide, you will need to specify the details of your Ethernet and loopback interfaces, the leaf switch OSPF router ID and interfaces, the intefaces that will have PIM multicast enabled, the BGP AS and other BGP configuration details. These settings need to be configured for each leaf switch in your network.
wrlablfswb01.yml
eth_interfaces:
  - { int: Ethernet1/1, addr: 10.199.223.6, mask: 30, desc: TO WRLABSWSWB01 Eth1/2 }

loopback_int:
  - { int: loopback0, addr: 10.199.220.3, mask: 32, desc: OSPF Underlay }
  - { int: loopback1, addr: 10.199.221.3, mask: 32, desc: VXLAN VTEP Loopback }

rid: 10.199.220.3

ospf_eth_int:
  - { int: Ethernet1/1, afi: ipv4, area_id: 0.0.0.0, netw: point-to-point, proc_id: WRLAB-DC2 }

ospf_loop_int:
  - { int: loopback0, afi: ipv4, area_id: 0.0.0.0, netw: point-to-point, proc_id: WRLAB-DC2 }
  - { int: loopback1, afi: ipv4, area_id: 0.0.0.0, netw: point-to-point, proc_id: WRLAB-DC2 }

pim_int:
  - { int: loopback0 }
  - { int: loopback1 }
  - { int: Ethernet1/1 }

bgp_neighbours:
  - { neighbour: 10.199.220.2, template_name: SPINE }

bgp_templates:
  - { template_name: SPINE, afi: ipv4, safi: unicast, update_source: Loopback0, evpn_afi: l2vpn, evpn_safi: evpn, rr_client: false, remote_as: 65002 }

nve_int: nve1

nve_src_int: Loopback1
wrlablfswb02.yml
eth_interfaces:
  - { int: Ethernet1/1, addr: 10.199.223.10, mask: 30, desc: TO WRLABSWSWB01 Eth1/3 }

loopback_int:
  - { int: loopback0, addr: 10.199.220.4, mask: 32, desc: OSPF Underlay }
  - { int: loopback1, addr: 10.199.221.4, mask: 32, desc: VXLAN VTEP Loopback }

rid: 10.199.220.4

ospf_eth_int:
  - { int: Ethernet1/1, afi: ipv4, area_id: 0.0.0.0, netw: point-to-point, proc_id: WRLAB-DC2 }

ospf_loop_int:
  - { int: loopback0, afi: ipv4, area_id: 0.0.0.0, netw: point-to-point, proc_id: WRLAB-DC2 }
  - { int: loopback1, afi: ipv4, area_id: 0.0.0.0, netw: point-to-point, proc_id: WRLAB-DC2 }

pim_int:
  - { int: loopback0 }
  - { int: loopback1 }
  - { int: Ethernet1/1 }

bgp_neighbours:
  - { neighbour: 10.199.220.2, template_name: SPINE }

bgp_templates:
  - { template_name: SPINE, afi: ipv4, safi: unicast, update_source: Loopback0, evpn_afi: l2vpn, evpn_safi: evpn, rr_client: false, remote_as: 65002 }

nve_int: nve1

nve_src_int: Loopback1
wrlablfswb03.yml
eth_interfaces:
  - { int: Ethernet1/1, addr: 10.199.223.14, mask: 30, desc: TO WRLABSWSWB01 Eth1/4 }

loopback_int:
  - { int: loopback0, addr: 10.199.220.5, mask: 32, desc: OSPF Underlay }
  - { int: loopback1, addr: 10.199.221.5, mask: 32, desc: VXLAN VTEP Loopback }

rid: 10.199.220.5

ospf_eth_int:
  - { int: Ethernet1/1, afi: ipv4, area_id: 0.0.0.0, netw: point-to-point, proc_id: WRLAB-DC2 }

ospf_loop_int:
  - { int: loopback0, afi: ipv4, area_id: 0.0.0.0, netw: point-to-point, proc_id: WRLAB-DC2 }
  - { int: loopback1, afi: ipv4, area_id: 0.0.0.0, netw: point-to-point, proc_id: WRLAB-DC2 }

pim_int:
  - { int: loopback0 }
  - { int: loopback1 }
  - { int: Ethernet1/1 }

bgp_neighbours:
  - { neighbour: 10.199.220.2, template_name: SPINE }

bgp_templates:
  - { template_name: SPINE, afi: ipv4, safi: unicast, update_source: Loopback0, evpn_afi: l2vpn, evpn_safi: evpn, rr_client: false, remote_as: 65002 }

nve_int: nve1

nve_src_int: Loopback1
For your border leaf/gateway switches, again, the required host variables are the much the same as with the leaf switch with some additional variables for VRF's and any BGP peer details that are not part of the VXLAN fabric.
wrlabbgswb01.yml
eth_interfaces:
  - { int: Ethernet1/2, addr: 10.199.223.1, mask: 30, desc: TO WRLABSPSWB01 Eth1/1 }
  - { int: Ethernet1/3, addr: 10.200.200.22, mask: 30, desc: TO WELABBGSWA01 Eth1/3 }

vrf_interfaces:
  - { int: Ethernet1/1, addr: 10.199.213.17, mask: 30, desc: TO WRLABCRSW01 Eth1/5, tag: 54321, vrf: Prod }

loopback_int:
  - { int: loopback0, addr: 10.199.220.1, mask: 32, desc: OSPF Underlay }
  - { int: loopback1, addr: 10.199.221.1, mask: 32, desc: VXLAN VTEP Loopback }

rid: 10.199.220.1

ospf_eth_int:
  - { int: Ethernet1/2, afi: ipv4, area_id: 0.0.0.0, netw: point-to-point, proc_id: WRLAB-DC2 }

ospf_loop_int:
  - { int: loopback0, afi: ipv4, area_id: 0.0.0.0, netw: point-to-point, proc_id: WRLAB-DC2 }
  - { int: loopback1, afi: ipv4, area_id: 0.0.0.0, netw: point-to-point, proc_id: WRLAB-DC2 }

pim_int:
  - { int: loopback0 }
  - { int: loopback1 }
  - { int: Ethernet1/2 }

bgp_neighbours:
  - { neighbour: 10.199.220.2, template_name: SPINE }

non_vxlan_bgp:
  - { remote_as: 65001, neighbour: 10.199.210.1, update_source: Loopback0, afi: ipv4, safi: unicast }

bgp_networks:
  - { afi: ipv4, safi: unicast, prefix: 10.200.200.16, mask: 30 }

bgp_templates:
  - { template_name: SPINE, afi: ipv4, safi: unicast, update_source: Loopback0, evpn_afi: l2vpn, evpn_safi: evpn, rr_client: false, remote_as: 65002 }

nve_int: nve1

nve_src_int: Loopback1
And finally, for the spine switch host variables, once again the required variables are much the same in regards to Interface and OSPF/BGP routing configuration.
wrlabspswb01.yml
eth_interfaces:
  - { int: Ethernet1/1, addr: 10.199.223.2, mask: 30, desc: TO WRLABBGSWB01 Eth1/2 }
  - { int: Ethernet1/2, addr: 10.199.223.5, mask: 30, desc: TO WRLABLFSWB01 Eth1/1 }
  - { int: Ethernet1/3, addr: 10.199.223.9, mask: 30, desc: TO WELABLFSWB02 Eth1/1 }
  - { int: Ethernet1/4, addr: 10.199.223.13, mask: 30, desc: TO WELABLFSWB03 Eth1/1 }

loopback_int:
  - { int: loopback0, addr: 10.199.220.2, mask: 32, desc: OSPF Underlay }
  - { int: loopback1, addr: 10.199.221.2, mask: 32, desc: VXLAN VTEP Loopback }
  - { int: loopback10, addr: 10.199.222.2, mask: 32, desc: RPZ Loopback }

rid: 10.199.220.2

ospf_eth_int:
  - { int: Ethernet1/1, afi: ipv4, area_id: 0.0.0.0, netw: point-to-point, proc_id: WRLAB-DC2 }
  - { int: Ethernet1/2, afi: ipv4, area_id: 0.0.0.0, netw: point-to-point, proc_id: WRLAB-DC2 }
  - { int: Ethernet1/3, afi: ipv4, area_id: 0.0.0.0, netw: point-to-point, proc_id: WRLAB-DC2 }
  - { int: Ethernet1/4, afi: ipv4, area_id: 0.0.0.0, netw: point-to-point, proc_id: WRLAB-DC2 }

ospf_loop_int:
  - { int: loopback0, afi: ipv4, area_id: 0.0.0.0, netw: point-to-point, proc_id: WRLAB-DC2 }
  - { int: loopback1, afi: ipv4, area_id: 0.0.0.0, netw: point-to-point, proc_id: WRLAB-DC2 }
  - { int: loopback10, afi: ipv4, area_id: 0.0.0.0, netw: point-to-point, proc_id: WRLAB-DC2 }

pim_int:
  - { int: loopback0 }
  - { int: loopback1 }
  - { int: loopback10 }
  - { int: Ethernet1/1 }
  - { int: Ethernet1/2 }
  - { int: Ethernet1/3 }
  - { int: Ethernet1/4 }

bgp_neighbours:
  - { neighbour: 10.199.220.1, template_name: BGW }
  - { neighbour: 10.199.220.3, template_name: LEAF }
  - { neighbour: 10.199.220.4, template_name: LEAF }
  - { neighbour: 10.199.220.5, template_name: LEAF }

bgp_templates:
  - { asn: 65002, template_name: LEAF, afi: ipv4, safi: unicast, update_source: Loopback0, evpn_afi: l2vpn, evpn_safi: evpn, rr_client: false, remote_as: 65002 }
  - { asn: 65002, template_name: BGW, afi: ipv4, safi: unicast, update_source: Loopback0, evpn_afi: l2vpn, evpn_safi: evpn, rr_client: false, remote_as: 65002 }
Once all of the host var files have been created, you can now create the group_vars files that will be used in this lab. Once again, these are required to ensure that the correct configurations are applied to the correct switches. Below are examples of the group_vars files that I have created for this lab scenario.
The following group_vars file is what will be applied to all switches within the VXLAN fabric and is used to enable the NX-OS features as well as some basic OSPF configuration. Note that the variable ospf_host_name is not required, I just like that when I run the sh ip ospf neigh command, I see hostnames not IP addresses.
dcb_switches.yml
leaf_features:
  - { feature: pim }
  - { feature: vn-segment-vlan-based }
  - { feature: nv overlay }

ospf_proc_dc2: WRLAB-DC2
ospf_area: 0.0.0.0

asn: 65002

ospf_host_name:
  - { name: WRLABBGSWB01, ip: 10.199.220.1 }
  - { name: WRLABSPSWB01, ip: 10.199.220.2 }
  - { name: WRLABLFSWB01, ip: 10.199.220.3 }
  - { name: WRLABLFSWB02, ip: 10.199.220.4 }
  - { name: WRLABLFSWB03, ip: 10.199.220.5 }
For the border leaf and leaf switch group_vars files, this needs to contain the L2 and L3 VNI information to be configured on the device, as well as any VRF's and route-maps that will be configured as part of the BGP evpn configuration. This is where you would also configure any VLAN's that will need to be applied to all border leaf and leaf switches for the Anycast gateway configuration.
For this lab, the border gateway will only host a single Anycast gateway for management servers, while the leaf switches will be configured for all of the required SVI's. Note the mcast_group variable is used for multicast routing of traffic within the fabric, you can configure this with a single multicast address for all VLAN's or a different multicast address for each VLAN, or one multicast address for border leafs, and another for leafs etc. Just remember, that the same VLAN must be configured with the same multicast address across all switches. The tag variable is used for redistribution of networks into BGP.
dcb_bgw.yml
vlan_l2vni:
  - { vlan_id: 3010, name: MGMT_SVRS, vni_id: 13010, addr: 10.199.10.1, mask: 24, mcast_grp: 239.0.0.10, vrf: Prod, tag: 54321 }

vlan_l3vni:
  - { vlan_id: 3000, name: L3_VNI, vni_id: 13000, vrf: Prod }

vrfs:
 - { vrf: Prod, vni_id: 13000, afi: ipv4, safi: unicast }

route_map_name: RM_CONNECTED_TO_BGP
dcb_leafs.yml
vlan_l2vni:
  - { vlan_id: 3010, name: MGMT_SVRS, vni_id: 13010, addr: 10.199.10.1, mask: 24, mcast_grp: 239.0.0.10, vrf: Prod, tag: 54321 }
  - { vlan_id: 3012, name: WEB_SVRS, vni_id: 13012, addr: 10.199.12.1, mask: 24, mcast_grp: 239.0.0.12, vrf: Prod, tag: 54321 }
  - { vlan_id: 3014, name: COMMON_SVRS, vni_id: 13014, addr: 10.199.14.1, mask: 24, mcast_grp: 239.0.0.14, vrf: Prod, tag: 54321 }
  - { vlan_id: 3100, name: LAB_WORKSTATIONS, vni_id: 13100, addr: 10.199.14.1, mask: 24, mcast_grp: 239.0.0.14, vrf: Prod, tag: 54321 }

vlan_l3vni:
  - { vlan_id: 3000, name: L3_VNI, vni_id: 13000, vrf: Prod }

vrfs:
 - { vrf: Prod, vni_id: 13000, afi: ipv4, safi: unicast }

route_map_name: RM_CONNECTED_TO_BGP
The final inventory file that is required as part of this lab, is the group var file network_lab. This file contains a list of all of the NX-OS features to be enabled by default on all NX-OS switches. You can add any NX-OS feature that you want to enable here such as tacacs+ or scp-server simply by adding another line to the list.
network_lab.yml
lab_nxos_base_features:
  - { feature: ospf }
  - { feature: bgp }
  - { feature: ospfv3 }
  - { feature: interface-vlan }
  - { feature: bfd }
Once all of the required inventory, host, and group var files have been created, it's finally time to start create the playbook. For this lab, i've configured ansible roles with separate task files to perform the various configurations for each switch. When using ansible roles, these function slightly differently to using a normal playbook. With a playbook, all tasks are done in a single file, however with roles, the ansible folder structure is a bit different and the creation of a role folder is required. The role folder, will include subfolders for different things such as templates, or tasks etc. For this lab, I have created several role folders to be able to apply the different stages of configuration. The first role is to configure and apply the required base configuration to the virtual switches. This base configuration will apply basic interface settings on each switch as well as enable all of the required features that will be used to configure VXLAN.
The folder structure for this first role is as follows
(ansible root)
roles
- dcb_base
- tasks
- main.yml
- base_interfaces.yml
- enable_features.yml
While I have setup the folder/file structure as above, you can simply create a single main.yml file under the role/tasks folder, and create all of your ansible tasks in that single file. I prefer to use the main.yml file to select which other task files to run as I find it provides me greater flexibility on what hosts/groups to to perform tasks on as well as a cleaner task file in that each task is broken down and anything in that task file is only for that task. With that said, if you want to follow my lab setup, below are the example scripts for the lab_dcb_base role.
The main.yml file only contains tasks to run the other files as part of this role. In this lab, the main.yml file will call the base_interfaces.yml task, then the lab_enable_features.yml tasks.
main.yml
- name: Configure all switch ethernet and loopback interfaces
  include_role:
    name: lab_dcb_base
    tasks_from: base_interfaces.yml

- name: Enable the required NX-OS features
  include_role:
    name: lab_dcb_base
    tasks_from: enable_features.yml
The base_interfaces.yml task file does exacty that, it configures each switches Ethernet and loopback interface as per the inventory files.
base_interfaces.yml
- name: Configure Interfaces as Layer3
  cisco.nxos.nxos_interfaces:
    config:
      - name: "{{ item.int }}"
        description: "{{ item.desc }}"
        mode: layer3
        enabled: true
  loop: "{{ eth_interfaces }}"

- name: Configure Interface IP addresses
  cisco.nxos.nxos_l3_interfaces:
    config:
      - name: "{{ item.int }}"
        ipv4:
          - address: "{{ item.addr }}/{{ item.mask }}"
  loop: "{{ eth_interfaces }}"

- name: Configure the loopback Interfaces
  cisco.nxos.nxos_interfaces:
    config:
      - name: "{{ item.int }}"
        description: "{{ item.desc }}"
        enabled: true
  loop: "{{ loopback_int }}"

- name: Confgure IP for loopbacks
  cisco.nxos.nxos_l3_interfaces:
    config:
      - name: "{{ item.int }}"
        ipv4:
          - address: "{{ item.addr }}/{{ item.mask }}"
  loop: "{{ loopback_int }}"
The lab_enable_features.yml task file does exactly that, it loops through enabling the features from the leaf_features list variable. The second task is required to enable the nv overlay evpn feature as there's no way to do that using the nxos_feature ansible module.
enable_features.yml
- name: Enable VXLAN features
  cisco.nxos.nxos_feature:
    feature: "{{ item.feature }}"
    state: enabled
  loop: "{{ leaf_features }}"

- name: Enable nv overlay evpn feature
  cisco.nxos.nxos_command:
    commands:
      - conf t
      - nv overlay evpn
Once you have all of your scripts and inventory files created, you will need to create the playbook. This is still created the same was as any other playbook, however you only need to include the ansible role that is to be applied and the host the playbook is run against. Below is an example of the playbook for this lab build so far.
---
- hosts: dcb_switches
  gather_facts: no
  roles:
    - dcb_base
With the final piece of the puzzle created, you can run the playbook. The command to do this will vary depending on your ansible configuration but below is the output of when I run the play. I've emitted most of the output as it was quite long and unnecessary.
[ray@wrlabansbl01 ansible]$ ansible-playbook -i inventories/lab/inventory.yml playbooks/lab/lab_roles.yml

PLAY [dcb_switches] *******************************************************************************************************************************************************************************************

TASK [Gathering Facts] ****************************************************************************************************************************************************************************************
ok: [wrlablfswb02]
ok: [wrlabbgwswb01]
ok: [wrlablfswb03]
ok: [wrlabspswb01]
ok: [wrlablfswb01]
------------------ OMITTED --------------------
TASK [dcb_base : Enable VXLAN features] *******************************************************************************************************************************************************************
ok: [wrlablfswb03] => (item={'feature': 'pim'})
ok: [wrlabbgwswb01] => (item={'feature': 'pim'})
ok: [wrlablfswb01] => (item={'feature': 'pim'})
ok: [wrlablfswb02] => (item={'feature': 'pim'})
ok: [wrlabspswb01] => (item={'feature': 'pim'})
ok: [wrlabbgwswb01] => (item={'feature': 'vn-segment-vlan-based'})
ok: [wrlablfswb01] => (item={'feature': 'vn-segment-vlan-based'})
ok: [wrlablfswb03] => (item={'feature': 'vn-segment-vlan-based'})
ok: [wrlablfswb02] => (item={'feature': 'vn-segment-vlan-based'})
ok: [wrlabspswb01] => (item={'feature': 'vn-segment-vlan-based'})
ok: [wrlabbgwswb01] => (item={'feature': 'nv overlay'})
ok: [wrlablfswb02] => (item={'feature': 'nv overlay'})
ok: [wrlablfswb01] => (item={'feature': 'nv overlay'})
ok: [wrlablfswb03] => (item={'feature': 'nv overlay'})
ok: [wrlabspswb01] => (item={'feature': 'nv overlay'})

TASK [dcb_base : Enable nv overlay evpn feature] **********************************************************************************************************************************************************
ok: [wrlabbgwswb01]
ok: [wrlablfswb01]
ok: [wrlabspswb01]
ok: [wrlablfswb02]
ok: [wrlablfswb03]

PLAY RECAP ****************************************************************************************************************************************************************************************************
wrlabbgwswb01              : ok=7    changed=0    unreachable=0    failed=0    skipped=0    rescued=0    ignored=0
wrlablfswb01               : ok=7    changed=0    unreachable=0    failed=0    skipped=0    rescued=0    ignored=0
wrlablfswb02               : ok=7    changed=0    unreachable=0    failed=0    skipped=0    rescued=0    ignored=0
wrlablfswb03               : ok=7    changed=0    unreachable=0    failed=0    skipped=0    rescued=0    ignored=0
wrlabspswb01               : ok=7    changed=0    unreachable=0    failed=0    skipped=0    rescued=0    ignored=0
That's it, you now have the base configuration applied to your switches. In the next part of this guide, we'll run through the VXLAN underlay configuration.
Thanks for checking out my blog. If you've noticed anything missing or have any questions, please leave a comment and let me know.
Add new comment