Configure Cisco ISE and FreeIPA for LDAP Authentication
I've used FreeIPA before in my lab environment and was using it to play around with vCenter server authentication but have now decided to expand on my home LDAP authentication by configuring Cisco ISE with an external identity source of my FreeIPA server using LDAP. I wanted to be able to configure access to my various Lab devices by configuring various LDAP groups for different types of access such as read-only and full admin rights etc. This process took a bit of playing around to figure out all of the specific attributes to configure so I thought i'd write up a post about it. For this post i'm using Cisco ISE version 3.2 and FreeIPA version 4.12. I will be creating a firewall admin user called ldapuser and a group called firewall-rw. These will be used by Cisco ISE to specify the administrator role for this user.
Configure IPA
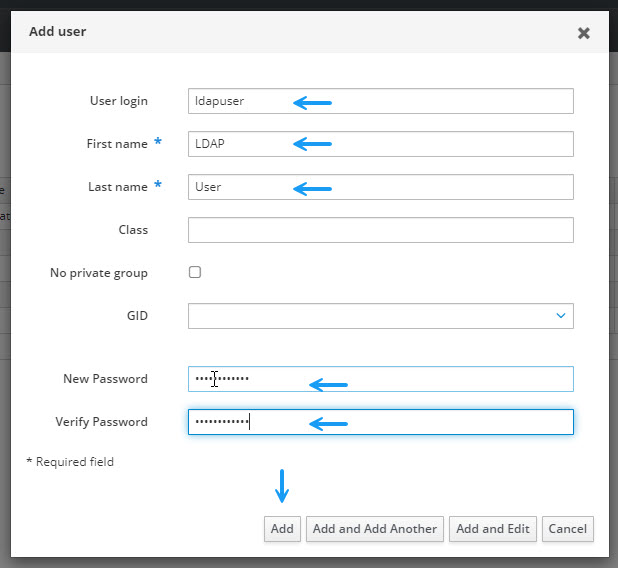
First you will need to configure a user on your FreeIPA server if you haven't already. Log in to your IPA server and navigate to Identity -> Users and click +Add to create a new user.

In the Add user window, fill in your user details and password and click add.
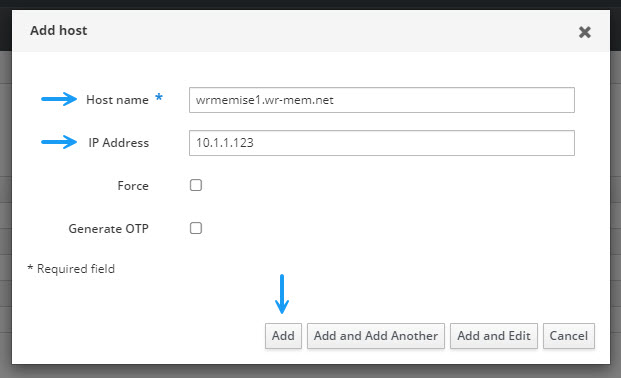
Now that you have your user, you ill need to add your Cisco ISE Server as a host. Navigate to the Hosts tab under Identity still, and click +Add.

In the Add Host window, specify your Cisco ISE server details in the hostname and IP address fileds and click Add. If you have more than one Cisco ISE server, you will need to add them all here.
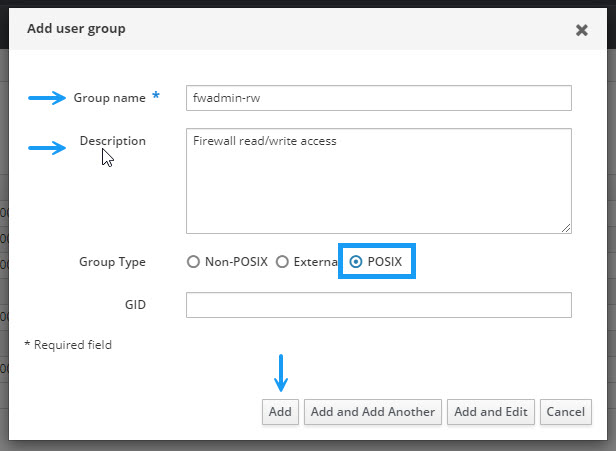
Now I will create the group for the firewall admin rights. To do that, navigate to the Droups tab in the Identity Section and click +add to create a new group.

Give your group a name and a description and ensure that the Group Type is set to POSIX. Once done, click Add.
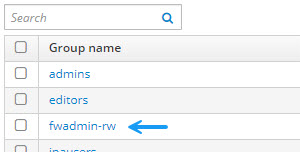
Now click on the newly created group to modify it.
On the group settings page, select the users tab and click Add to add a user to the group.
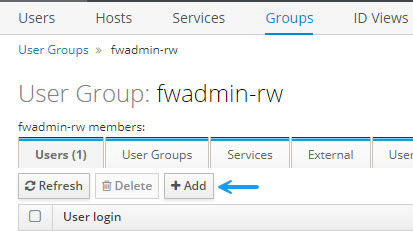
In the Add users into user group window, select your new user and click the > arrow to move the user into the Prospective section. Once done, click Add.

That's about it for IPA server configuration. Now it's time to configure your Cisco ISE server settings.
Configure Cisco ISE
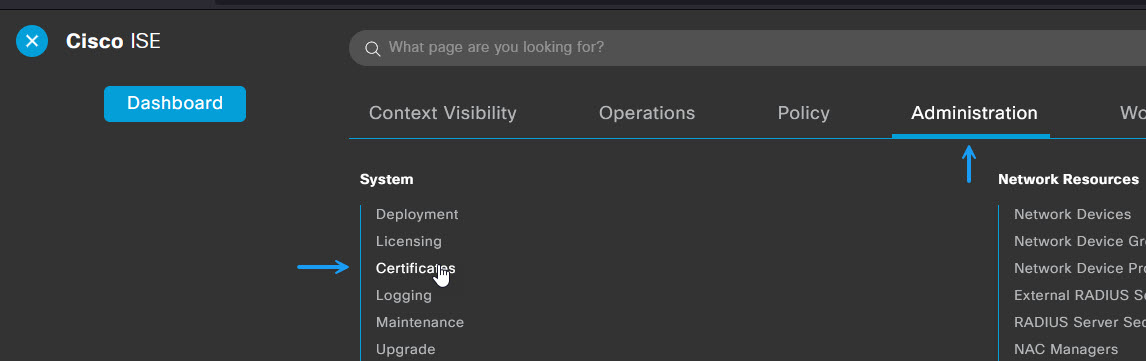
First thing to do is to import the FreeIPA servers CA certificate into the trusted certificates on your Cisco ISE server. Once you have a copy of the certificate, log into your Cisco ISE server and import the certificate by navigating to Administration -> System -> Certificates
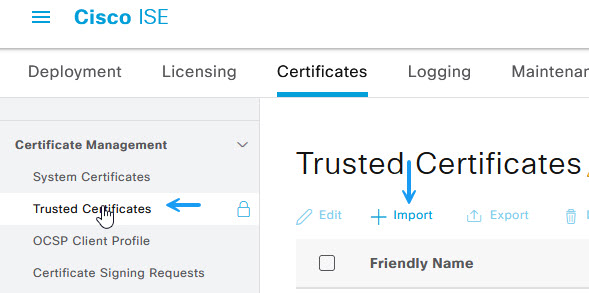
Select Trusted Certificates and then click Import to add a new certificate.
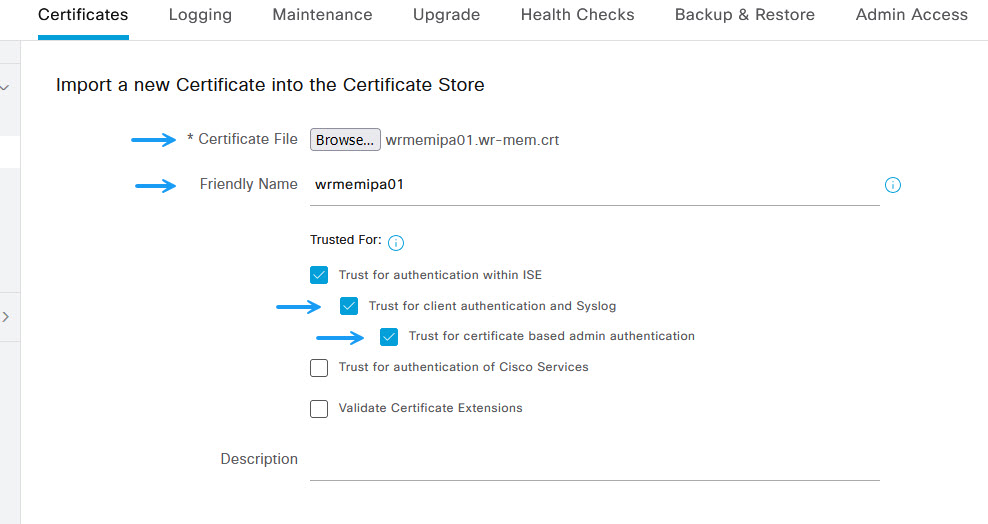
On the import new certificate page click Browse and locate Certificate of your IPA server. Once done, assign a friendly name and select Trust for client authentication and Syslog and click Submit.
Next, navigate to Admnistration -> Identity Management -> External Identity Sources
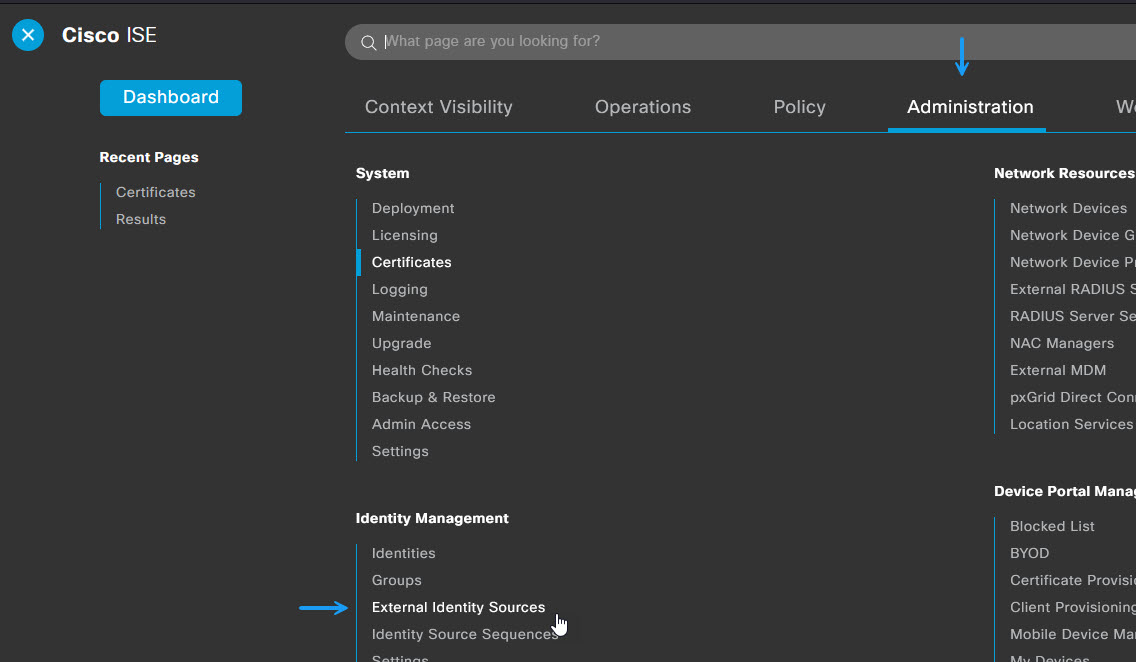
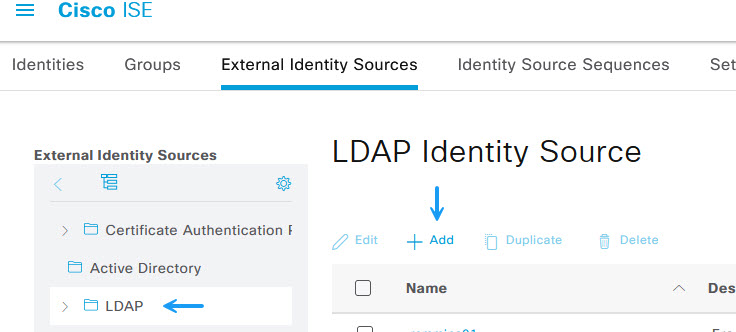
Select LDAP from the External Identity Sources menu and click + Add
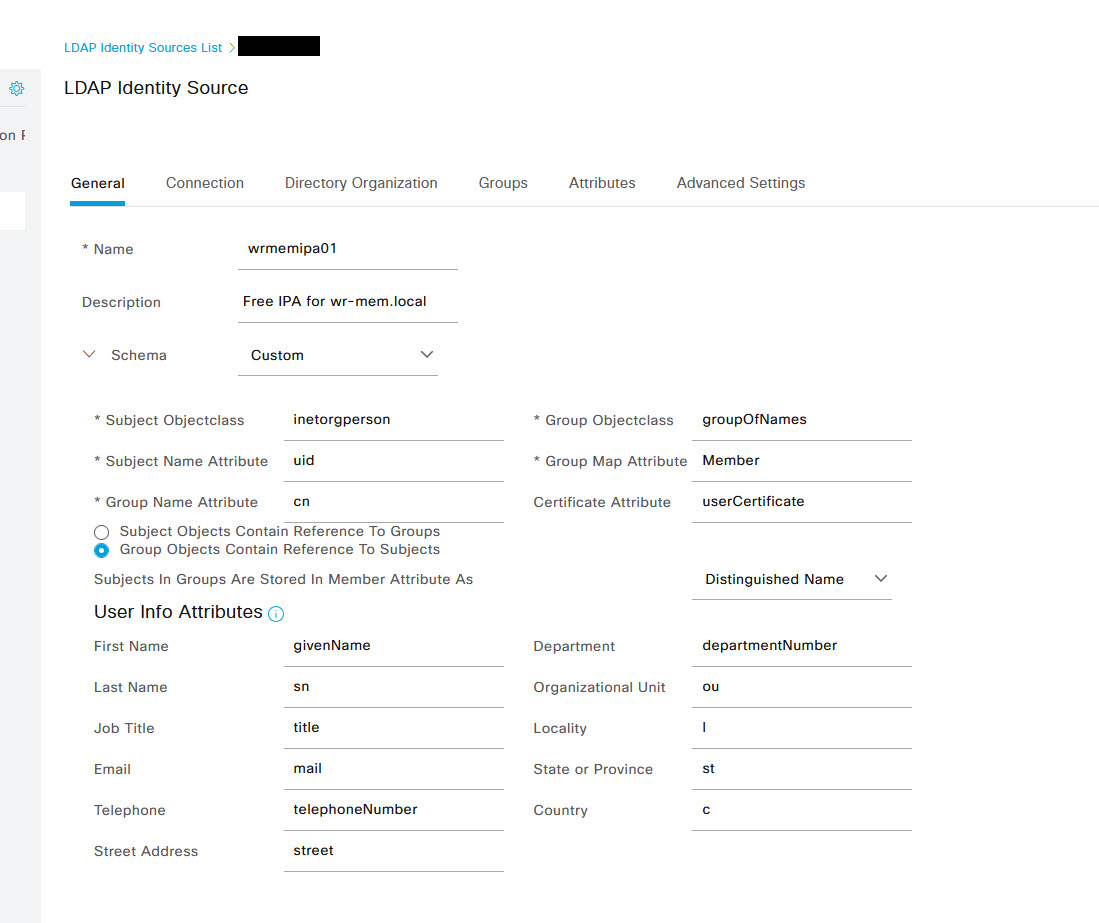
On the general tab of the add LDAP server page, add the following information:
- Name: Give the LDAP server/profile a recognisable name
- Schema: Select Custom
- Subject Object Class: inetorgperson
- Subject Name Attribute: uid
- Group Name Attribute: cn
- Group Object Class: groupOfNames
- Group Map Attribute: Member
For the rest of the options under User info Attributes, make sure they are set as follows:
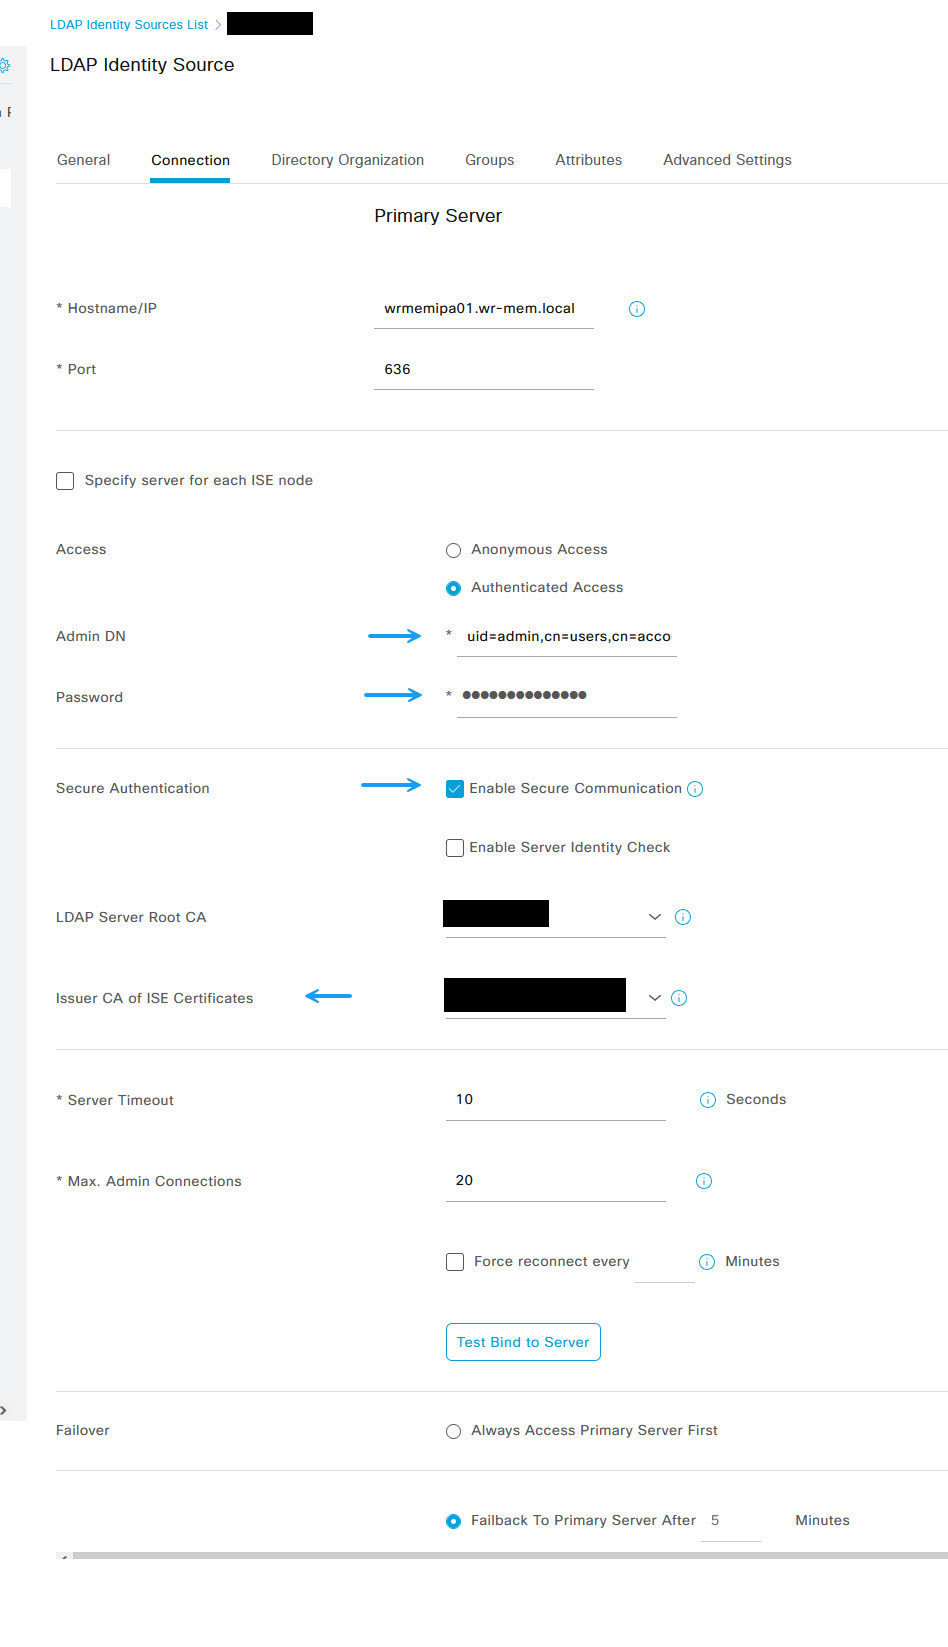
Once done, click on the connection tab and enter the IPA server details. If using LDAPS select use secure connection and ensure that the CA certificate's are installed in Cisco ISE as per the above steps.
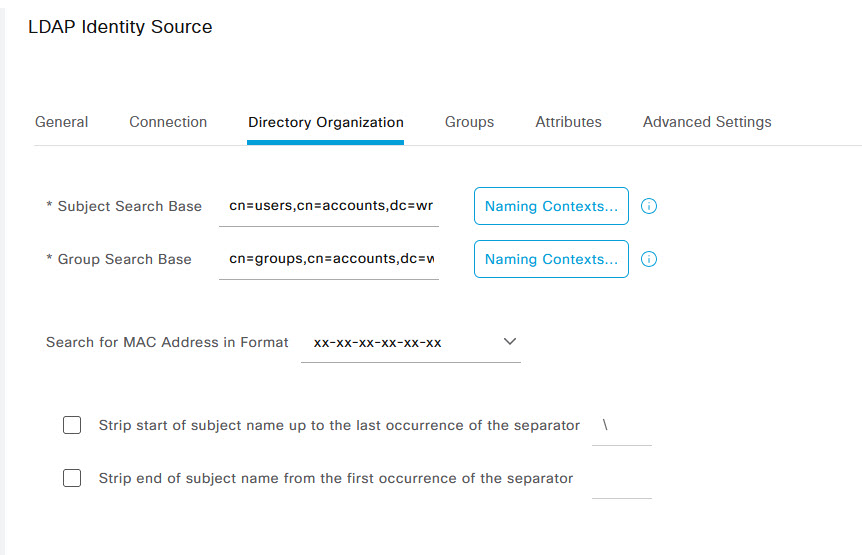
Once done, click on the Directory Organisation tab. Enter the Subject and Group search base as follows (unless you have a different structure to your FreeIPA Server)
- Subject Search Base: cn=users,cn=accounts,dc=wr-mem,dc=local
- Group Search Base: cn=groups,cn=accounts,dc=wr-mem,dc=local
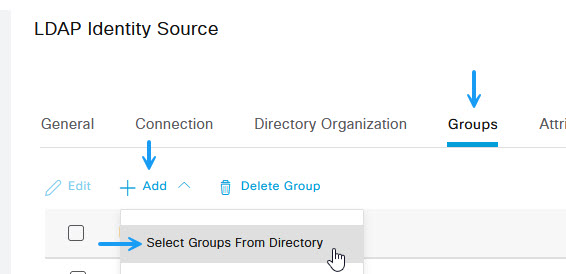
Once done, click on the groups tab. Click the Add button and select from directory.
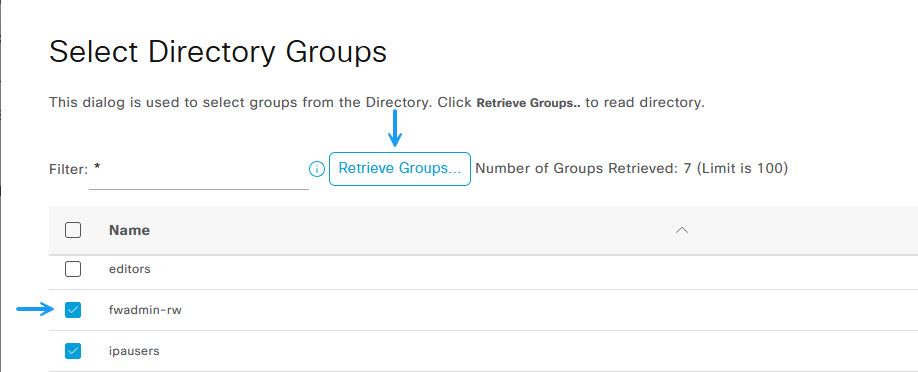
Click the Retrieve groups button to retrieve the groups available on your IPA Server. If the LDAP server settings are correct you should see all of your groups listed.
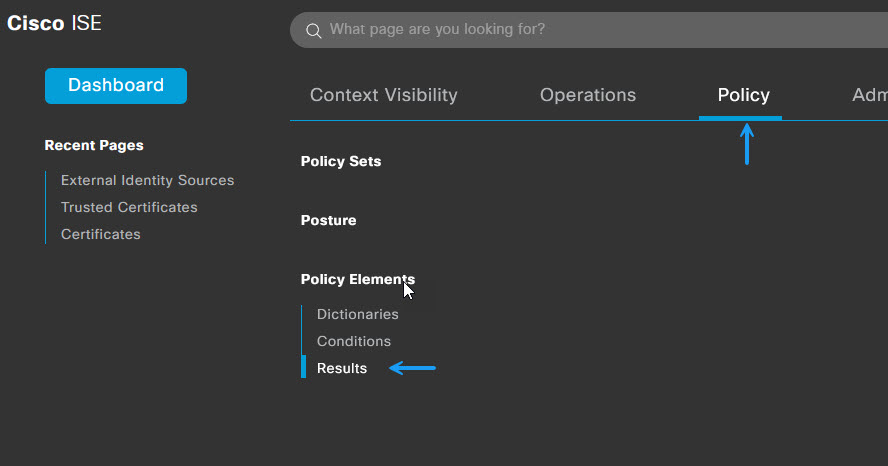
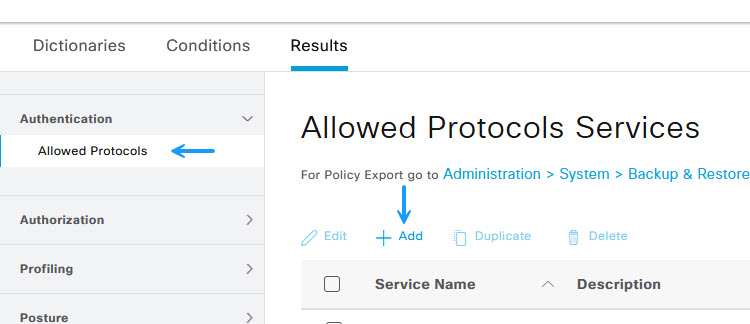
Save all of the LDAP Server settings and that part is now donw. Next you will need to create your policy to allow access. There are a few settings that need to be configured. I'll start by configuring the Allowed Protocols. Navigate to Policy -> Policy Elements -> Results
Under Allowed Protocols click +Add
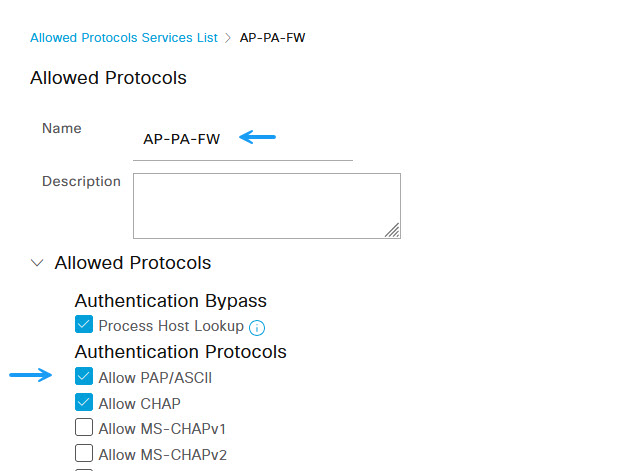
On the Allowed Protocols page, give the profile a name and fill in any other details you wish. Ensure PAP is allowed here as so far I haven't managed to get anything other than PAP to work. When I do i'll circle back to this and update the details. Once done, click Save.
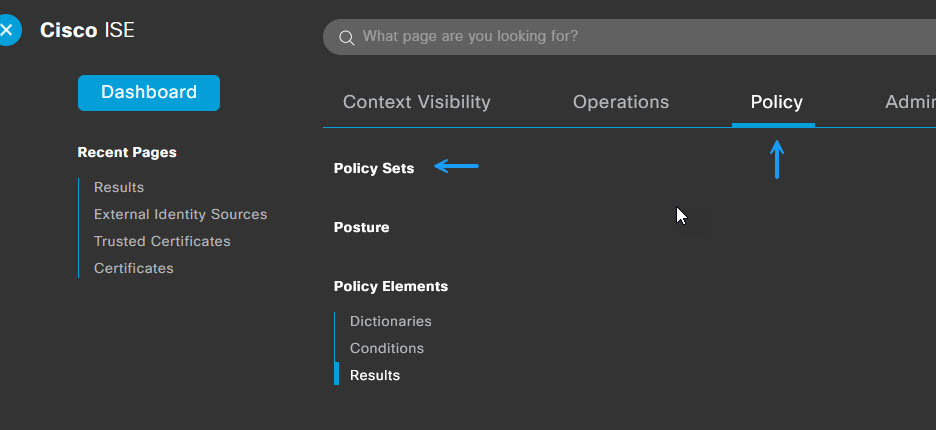
Next you will need to create your access policy. Navigate to Policy -> Policy Sets.
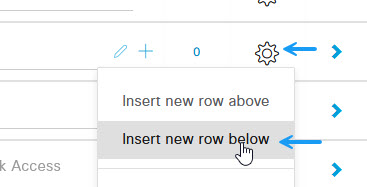
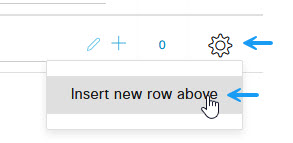
On policy Sets page, Click on the Cof and select Insert new row above or below to create a new policy.
Fill in policy details and select the protocol group created in previous step. Once done click the + under conditions to add a new condition.

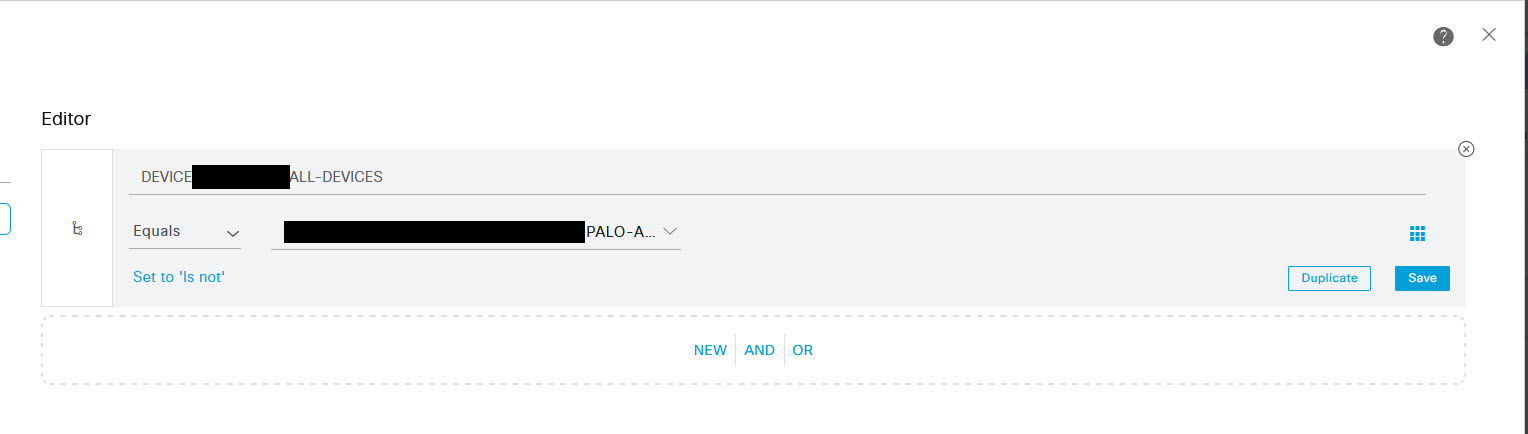
In the Conditions Studio window, select the options for your firewall grouping method. For me I have a device group called PALO-ALTO-FIREWALLS. Once done, scroll down and click Add.
With the initial policy settings configured, click the > icon to the right, and edit the policy settings. In the Policy page, expand the authentication policy section and configure the Use section as your LDAP server.

Next expand the authorisation section and click the cog on default and Insert new row above.
Give the Authorisation rule a name and select the results profile as Permit Access. Once done, click the + to add your authorisation conditions. (I've already got authorisation conditions in mine but a blank rule will just show a + icon)

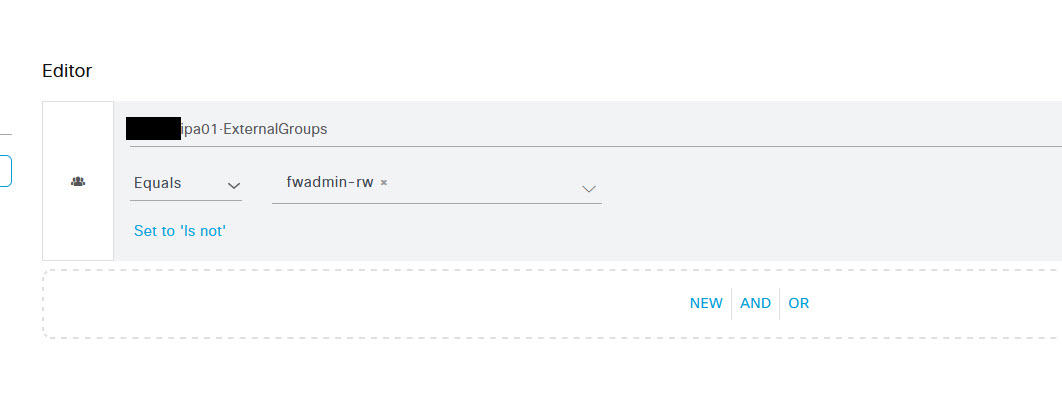
In the authorisation profile condition studio window, select the LDAP groups section and add the group that you want to allow access to your device. In this instance, it will be the group I created earlier, fwadmin-rw.
Once done, scroll down and click Save on the policy to save the settings. That's all that's required for Cisco ISE as well. Next it's time to configure your Palo Alto firewall.
Configure Palo Alto Firewall
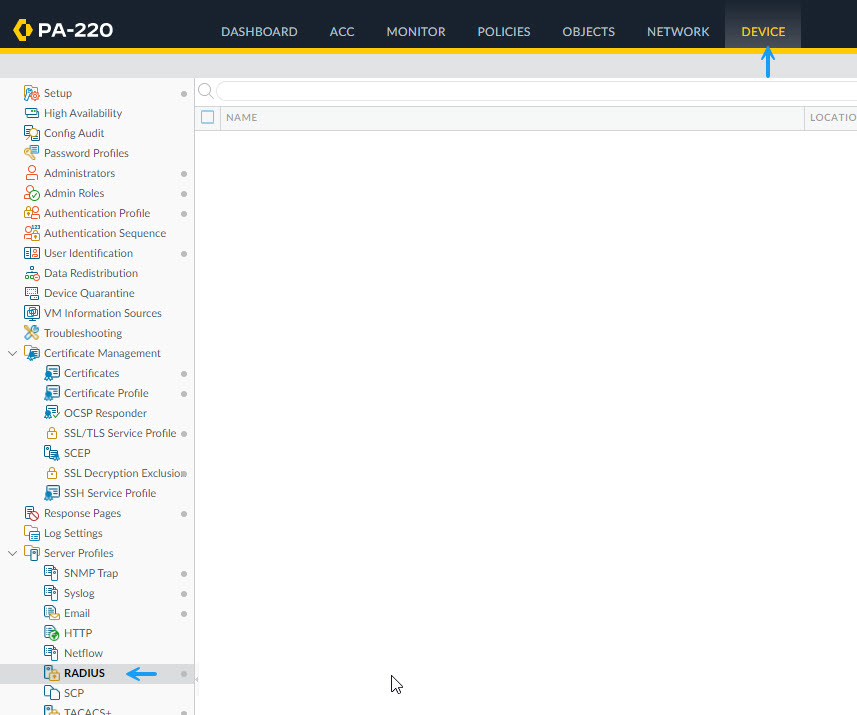
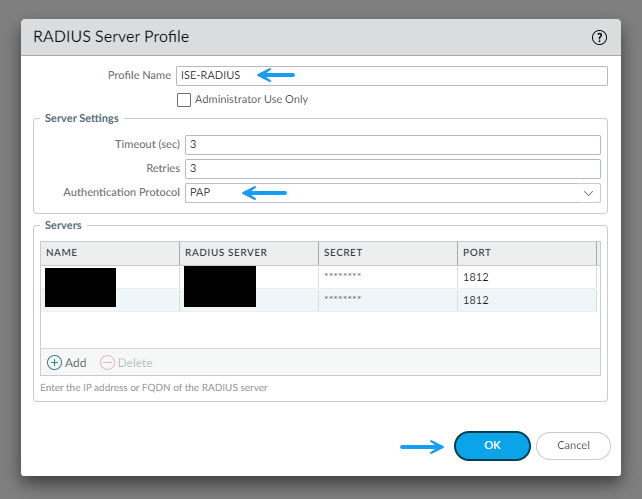
With everything configured ready for LDAP authentication, you will need to configure your PA firewall for radius authentication and also configure your admin user. Log into your PA Firewall and navigate to Device -> Server Profiles -> Radius and click Add to create a new Radius server
In the Radius Server Profile window, fill in profile name and server settings ensuring you select PAP for the authentication protocol. Clic on Add to add your Cisco ISE servers and the radius secrets (If your firewall isn't already configured in Cisco ISE as a device, you will also need to do that). Once done click OK.
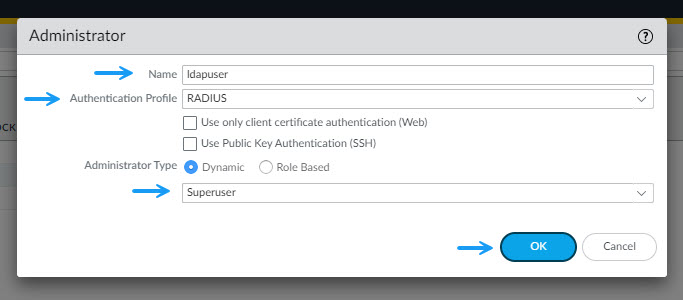
Next configure the radius user. This will be the user that we created earlier in FreeIPA. Navigate to Device -> Administrators and click Add to create a new user.

Fill in the user details that you created in FreIPA and for the Authentication Profile, select the Radius Profile that you just created. Also select the Administrator Type as Dynamic and set the type as Superuser. (You can do this dynamically which I will run through in another post). Once done, click OK.
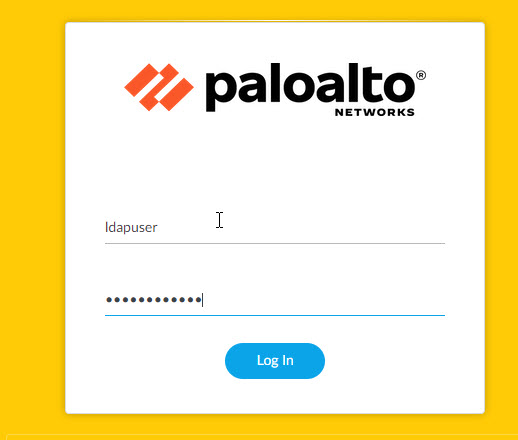
That's all that's required for the Palo Alto side. Once done, commit the changes and log out of the firewall. Once logged out, try logging in with your LDAP user credentials.
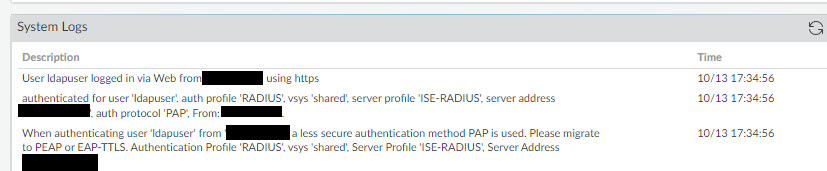
If all went well, you should now be logged in as your ldap user which you can verify by viewing the system logs.
That's it for basic LDAP authentication using Cisco ISE. As I mentioned earlier, I know PAP is not secure and should never be used outside of a Lab environment and once I have some time I will resolve that issue but for now, this is a basic run through of how to configure ISE to use an external FreeIPA server for authentication. Thanks for checking out my blog. If you've noticed anything missing or have any issues setting this up, please leave a comment and let me know.
Add new comment