Configuring Wired 802.1x using Cisco ISE
I've been playing around a lot lately with 802.1x on my home network and have successfully managed to get it setup and working with Freeradius using the standard Freeradius CA certificates for both wireless and wired and it works great. I'll post a blog article in the future on how to set it up using freeradius but for this post, I'm going to use Cisco ISE. Now that I have a second micro PC and 64GB of RAM in it, I have enough compute to deploy a small Cisco ISE server.
If you're not sure what 802.1x EAP-TLS authentication is, it's basically a way for authenticating end devices (Phones, laptops, printers etc) on the network using certificates instead of usernames and passwords. EAP-TLS is considered to be the gold standard of secure ways for authenticating end users/devices. Using certificates ensures that only approved devices who have a valid certificate signed by a trusted CA can authenticate to the network.
In my home lab, I've deployed a small Cisco ISE VM running version 3.2. I have no licenses so I am just using the 90 day free trial. Given it's just my home network it's not a big deal. If you want to do the same thing, it just means you have to to take a backup, deploy a new VM and restore the backup every 90 days. Kind of a pain in the ass I know, but who buy's licenses for a home lab.
So for this Lab I have a single Cisco ISE VM for Radius authentication, and will be using a Cisco 3560x switch as the supplicant. My end device is just a local PC running Windows 10.

Certificates
As you will be using certificates to authenticate our your users, you will need to generate a few of them. You will need to generate a server certificate for your ISE server, and all of your user certificates for your end devices. Each end device will need it's own user certificate to be created and deployed to it. I am using my own CA/ICA build that I have setup in my home lab. For a guide on how to deploy your own PKI servers, see my post here.
Configure ISE Certificates
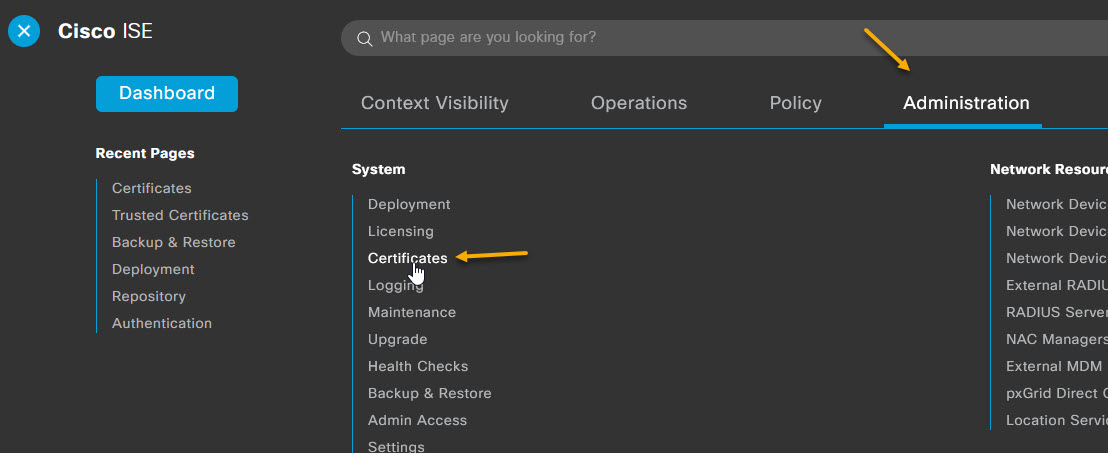
In order to be able to authenticate certificates, you will need to configure ISE to use a signed trusted certificate for EAP-TLS authentication. You will also need to ensure that the CA and ICA Root certificates are installed on your ISE server as trusted certificates. Let's go ahead and add the CA and ICA certificates to the trusted certificate store in ISE first. Log into your ISE server and navigate to Administration -> System -> Certificates
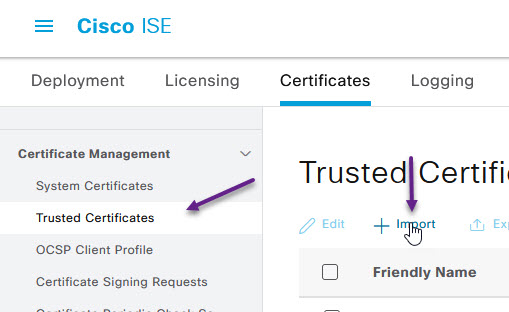
On the Certificate Management page, select the Trusted Certificates store on the left, and click + Import.
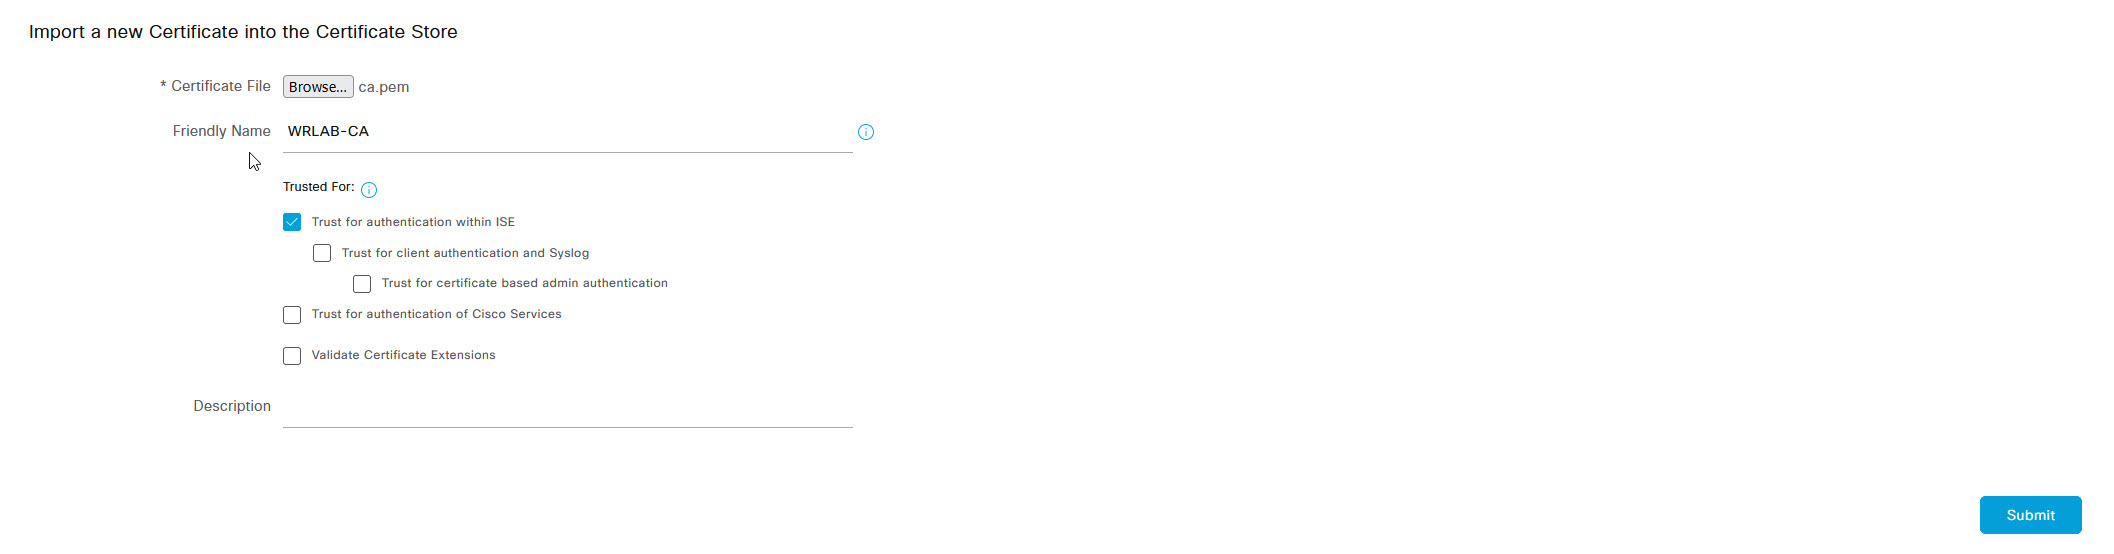
On the import a new Certificate page, click Browse and navigate to your CA certficate. Then assign the certificate a freindly name and click Submit. If you have an ICA, then repeat this step for the ICA certificate as well.
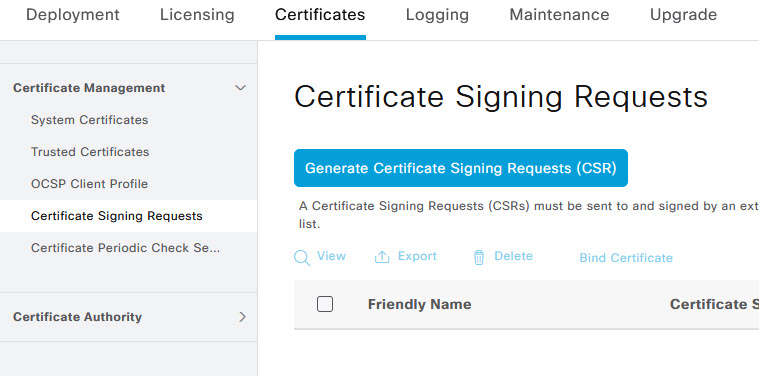
Now that we have our CA and ICA certificates trusted, it's time to create the server certificate that will be used for ISE EAP-TLS authentication. Navigate to the Certificate Signing Requests menu on the left of the Certificate Management page. Once on the Certificate Signing Requests page, click on Generate Certificate Signing Requests button.
For the Usage, select EAP Authentication and tick the ISE Node that the CSR is for. Fill in the details for the CSR as below.
- Certificate will be used for: EAP Authentication
- Node: Tick the box next to your ISE node
- Subject information: For the most part, this should match similar to your CA/ICA certificate however ensure that the Onganisational Unit is something unique as ISE requires unique certificate values for each certificate.
- SAN: This section allows you to create multiple DNS names and IP addresses and any other SAN information that you require.
- Key Type: Leave this as RSA
- Key Length: Again leave as default
- Digest to Sign With: I use SHA-512 here but you can use any value

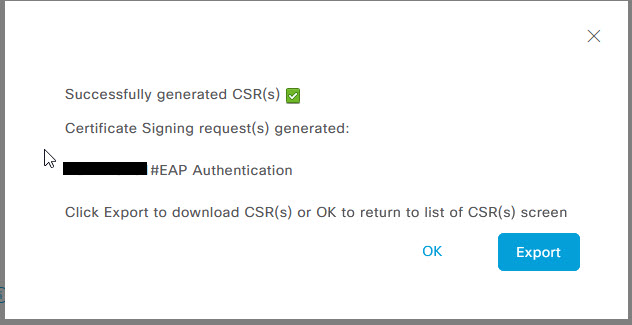
Once all of the certificate information is filled out, click on Generate. If you receive a message about a non resolvable FQDN, then you will need to make sure your DNS server is updated if you have one but for now, just click yes to continue. You will then be prompted with a successfully generated CSR page. Click the Export button on this page to export the CSR that will need to be signed by your CA/ICA server.
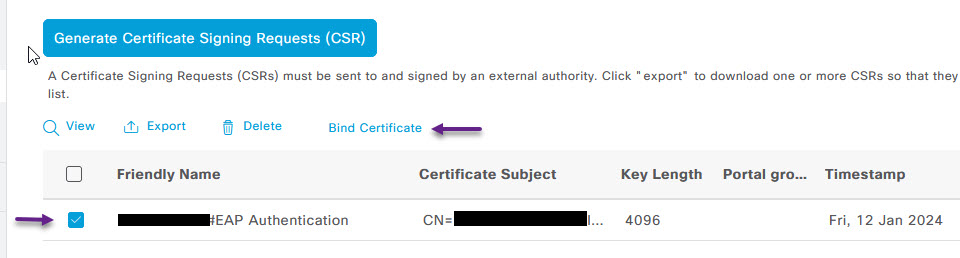
Once you have signed your CSR, and have a copy of it on your PC, on the Certificate Signing Requests page, you should see your CSR. Select it, and click Bind Certificate.
On the Bind CA Signed Certificate page, click the Browse button and navigate to your signed certificate. Give it a friendly name and click the submit button
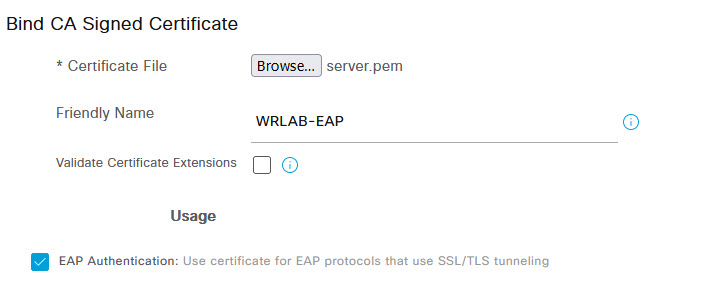
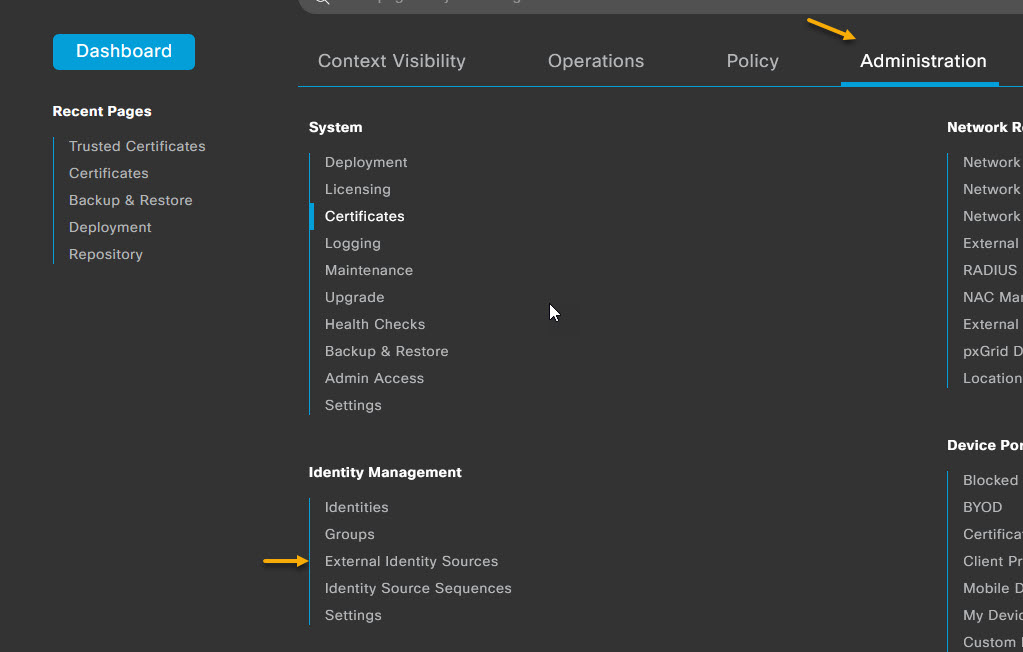
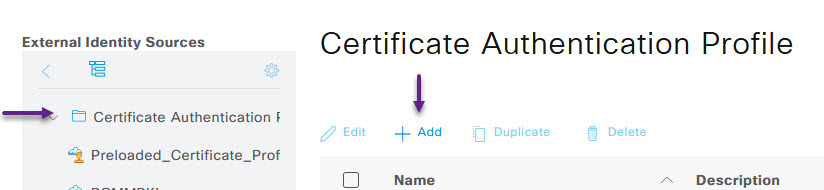
You'll receive a warning that only one certificate can be used for EAP, you can ignore this and click Yes. Once that's completed, you're done. You now have your server side certificates setup and ready to go for 802.1x authentication. The next thing you'll need to do, is to create your Certificate policy that will be used to authenticate users. To do that, navigate to Administration -> Identity Management -> External Identity Sources.
One the External Identity Sources page, select Certificate Authentication Profile from the menu on the left, and click + Add
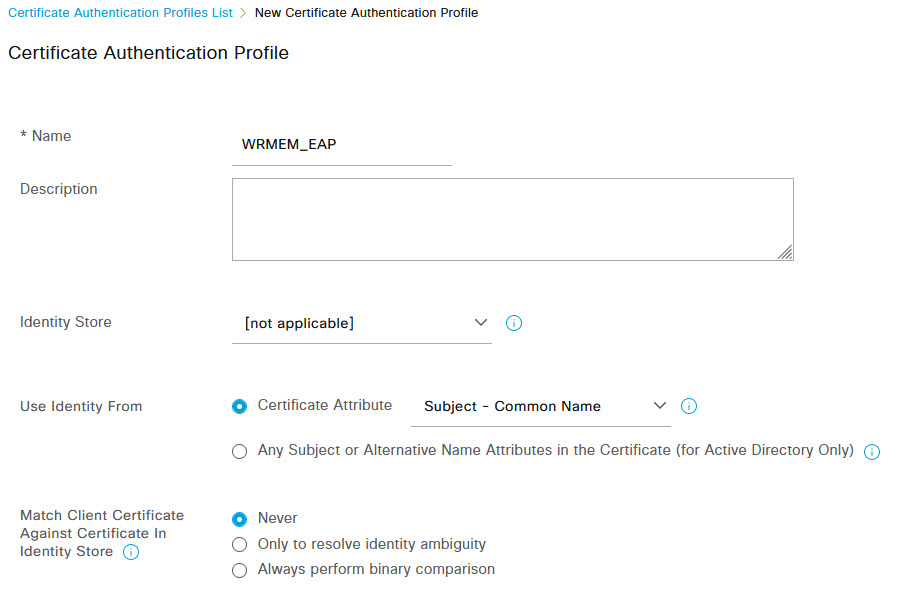
On the profile page, give the profile a name, and under the Use Identity From section, select Subject - Common Name if that's where your user identity is in your user certificates. (It will be if you used my PKI server build and are using this guide). Leave the rest as defaults and click Submit.
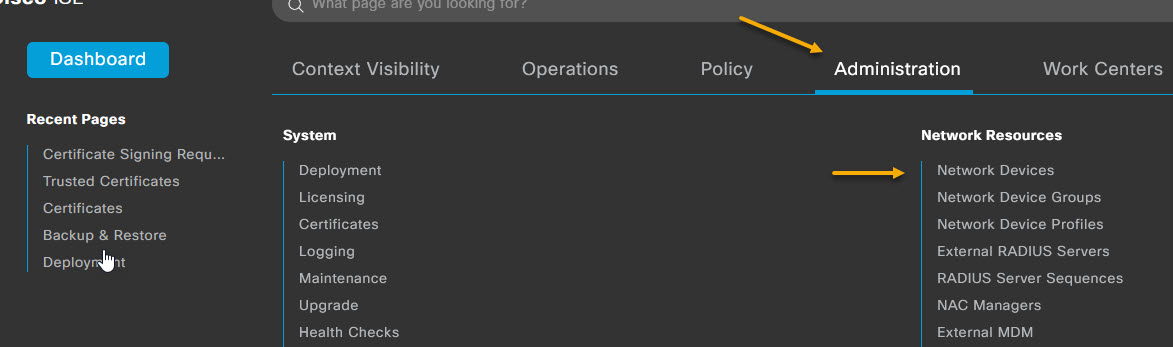
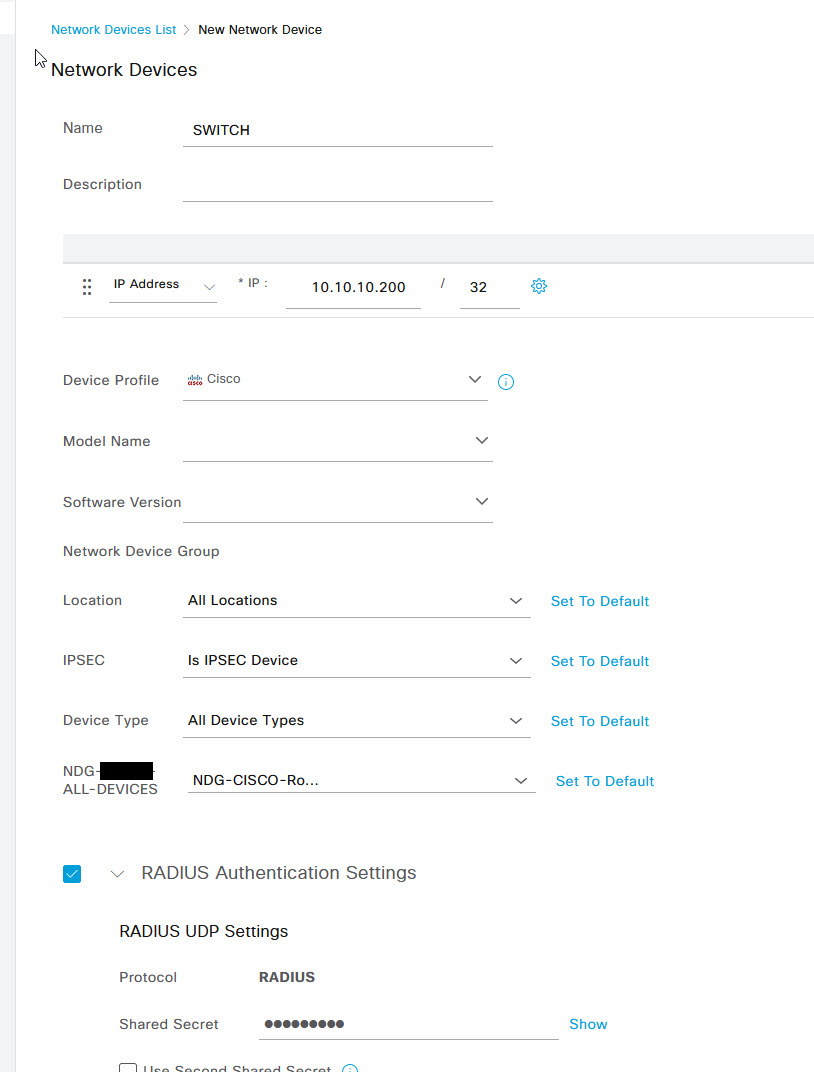
Ok, with that done, let's add our Network Device that will be the supplicant in our 802.1x deployment. In this case, it's my Cisco 3560x switch. Navigate to Administration -> Network Resources -> Network Devices.
On the Network Devices page, click on the + Add button to add a new device.
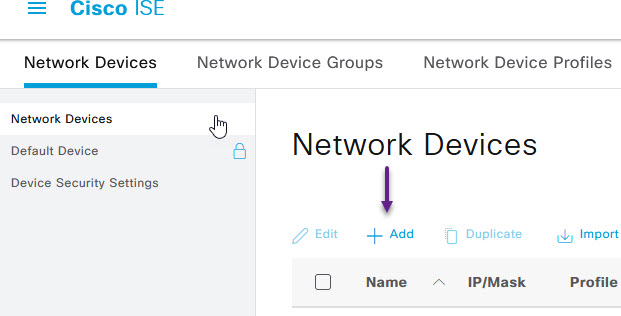
On the New Network Device page, fill in all of the device details such as Name, IP address, and give the device a type or Device group if you have one created. Something that you can use to match on in your Radius Policy. Scroll down the ISE page and tick the RADIUS Authentication Settings check box and enter in a Shared Secret. Once done, click Submit at the bottom of the page.
You will also need to create a new policy element for the allowed protocols. To do this, navigate to Policy -> Policy Elements -> Results.
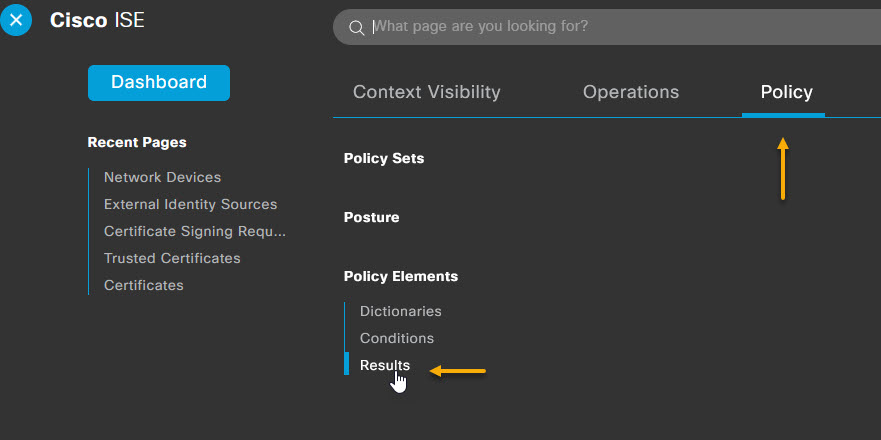
Under the Results page, select Authentication -> Allowed Protocols from the menu on the left. Then click the + Add button to add a new service.

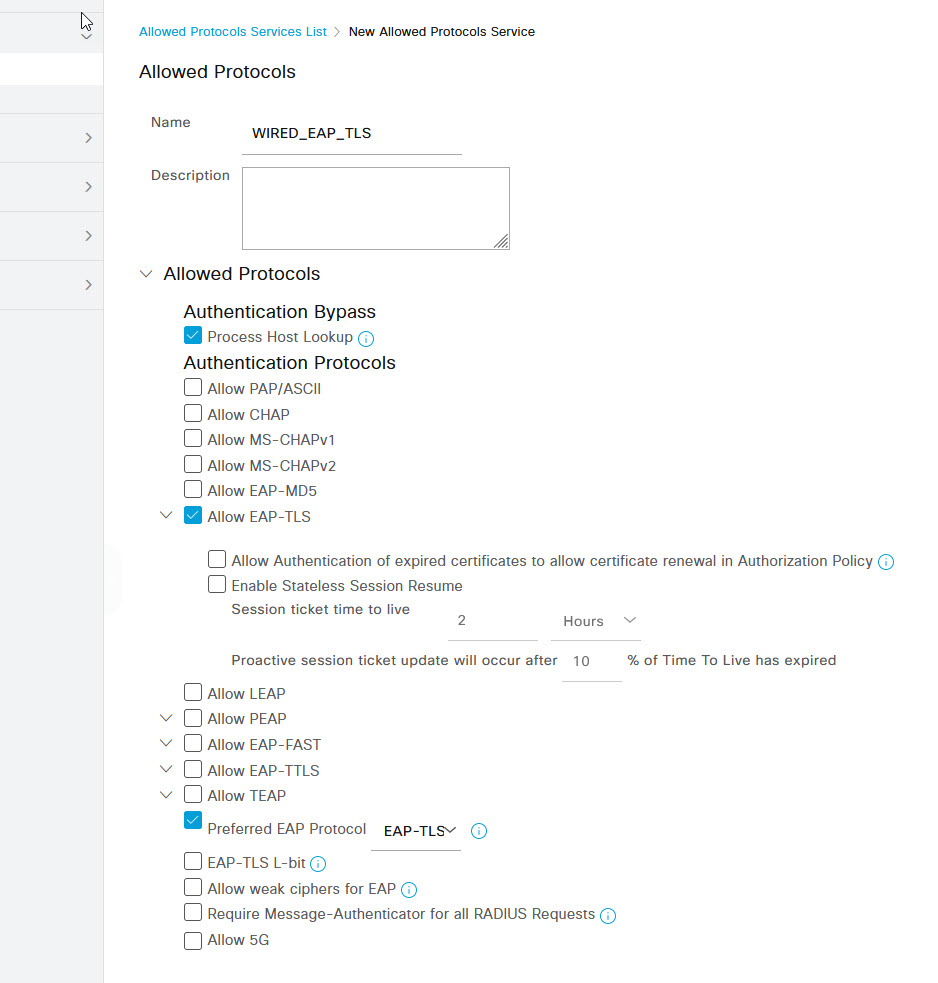
On the New Allowed Protocols page, give the service a name such as WIRED_EAP_TLS and untick all Authentication Protocols except for Allow EAP-TLS and set the Preferred EAP Protocol to EAP-TLS. Once done, click Submit.
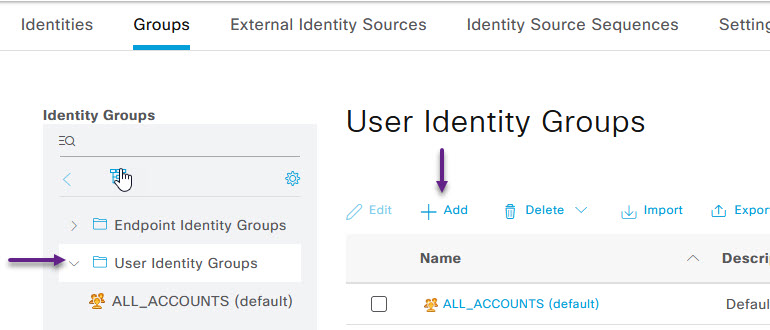
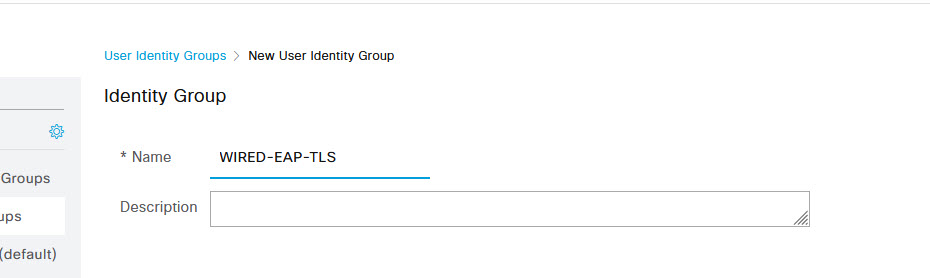
And one last step before we can create the Radius Policy. You will need to create a User Identity Group, and the User that the certificate will match against in order to give access to the network. To create the User Identity Group, navigate to Administration -> Identity Management -> Groups.

On the Identity Groups page, select User Identity Groups menu on the left, and click the + Add button
On the Identity Group page, give the group a name such as WIRED-EAP-TLS and click Submit. This is the group that you will assign to your Wired EAP-TLS users that you create.
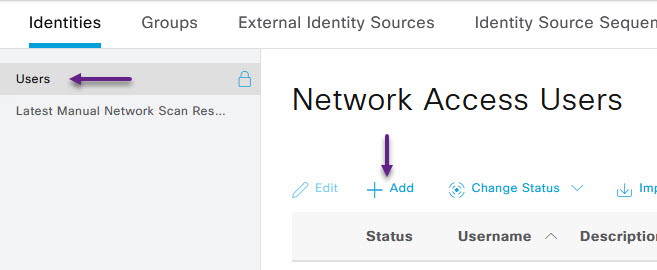
Now you can create your User. To do that, navigate to Administration -> Identity Management -> Identities. Make sure that Users is selected from the menu on the left, and click the + Add button on the Network Access Users page.
Give the user a name and configure the email address, password and user information etc. Make sure that the username matches the username that you will configure for the user certificate and that you select the WIRED-EAP-TLS group under the User Groups section at the bottom of the Create User page.
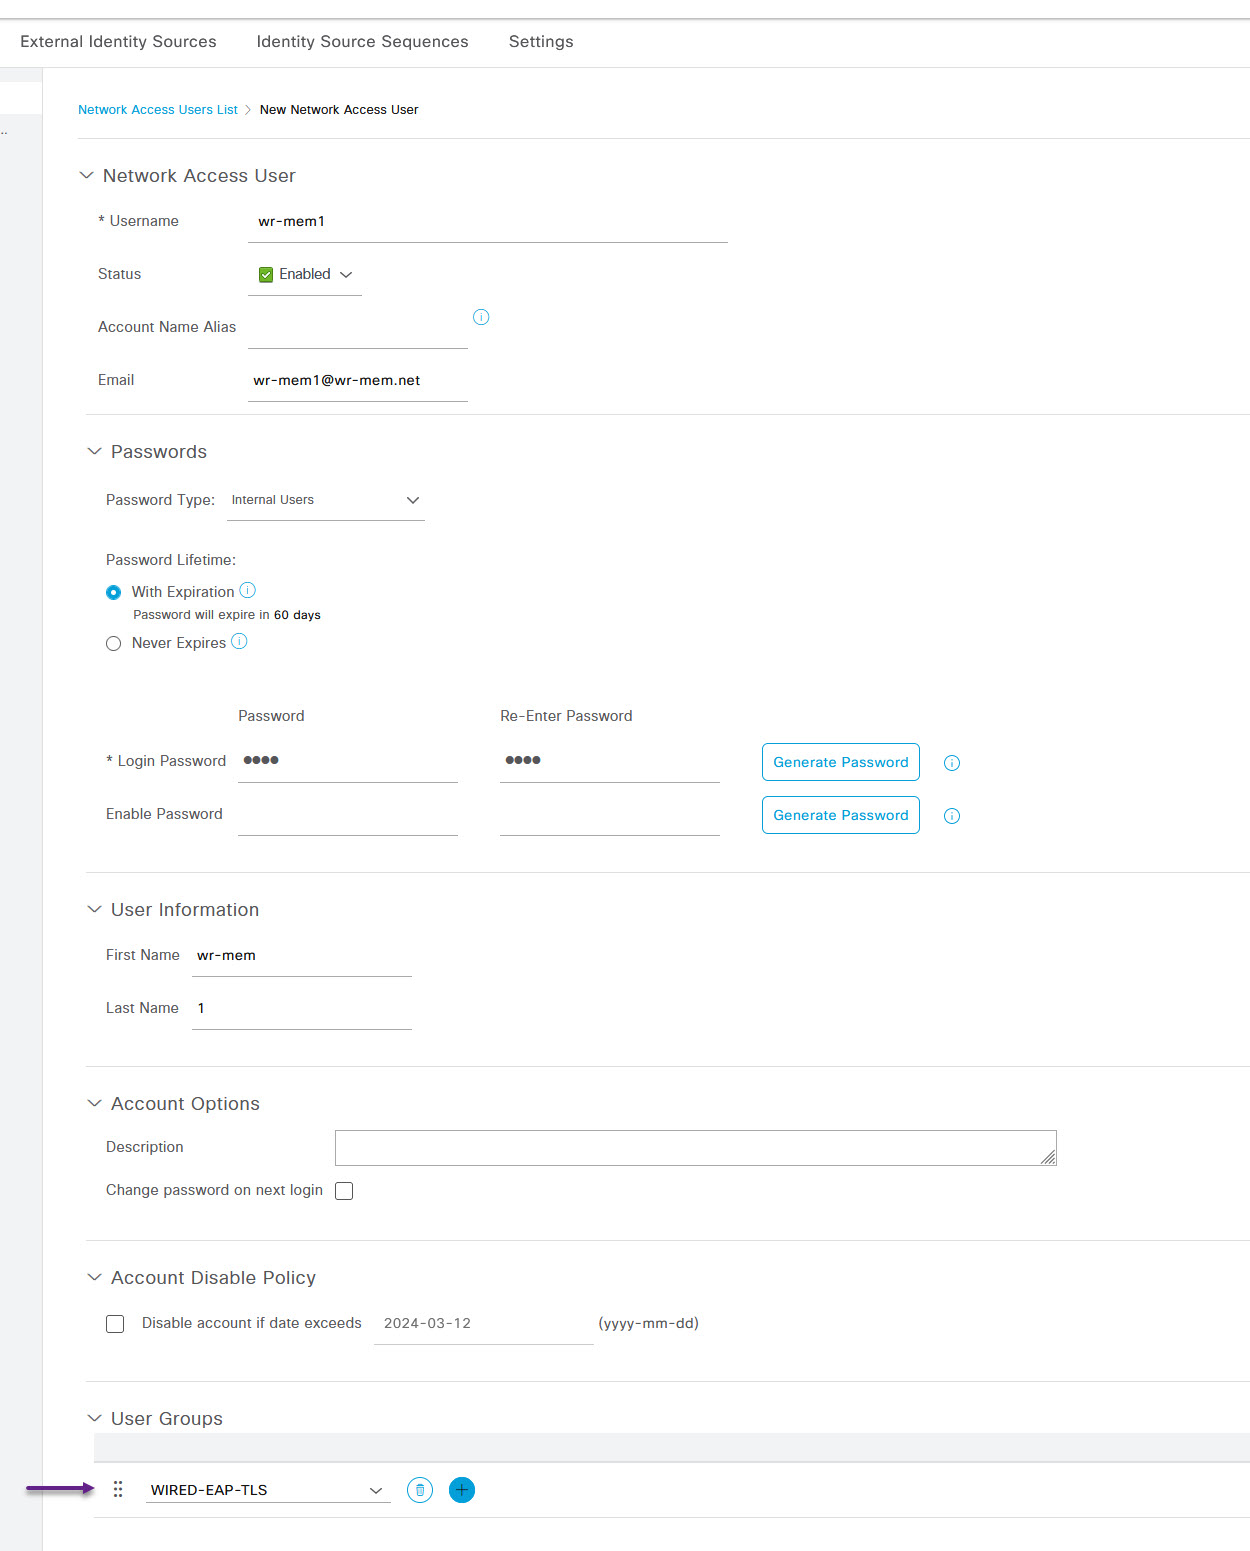
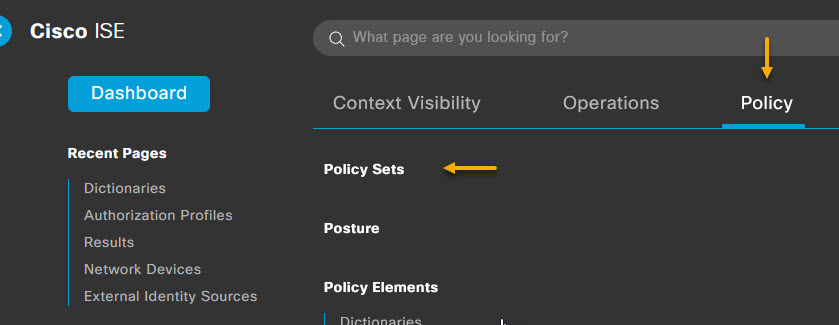
Once you've filled in all of the required details, click the Submit button at the bottom of the page. That's it, now you can go ahead and configure the wired EAP-TLS Radius policy. To do that, navigate to Policy -> Policy Sets.
Click on the cog to the right of the default policy, and select Insert new row above.

This will create a new policy above the Default policy. Click in the New Policy Set 1 field and give it a name such as Wired 802.1x and then under the Allowed Protocols column, select your WIRED_EAP_TLS service from the drop down menu. Once you've done that, click on the + under the Conditions column.

On the Conditions Studio page, You should see Wired_802.1X in the library list on the left. Select that and drag it over to the Editor side of the page where it says NEW|AND|OR.
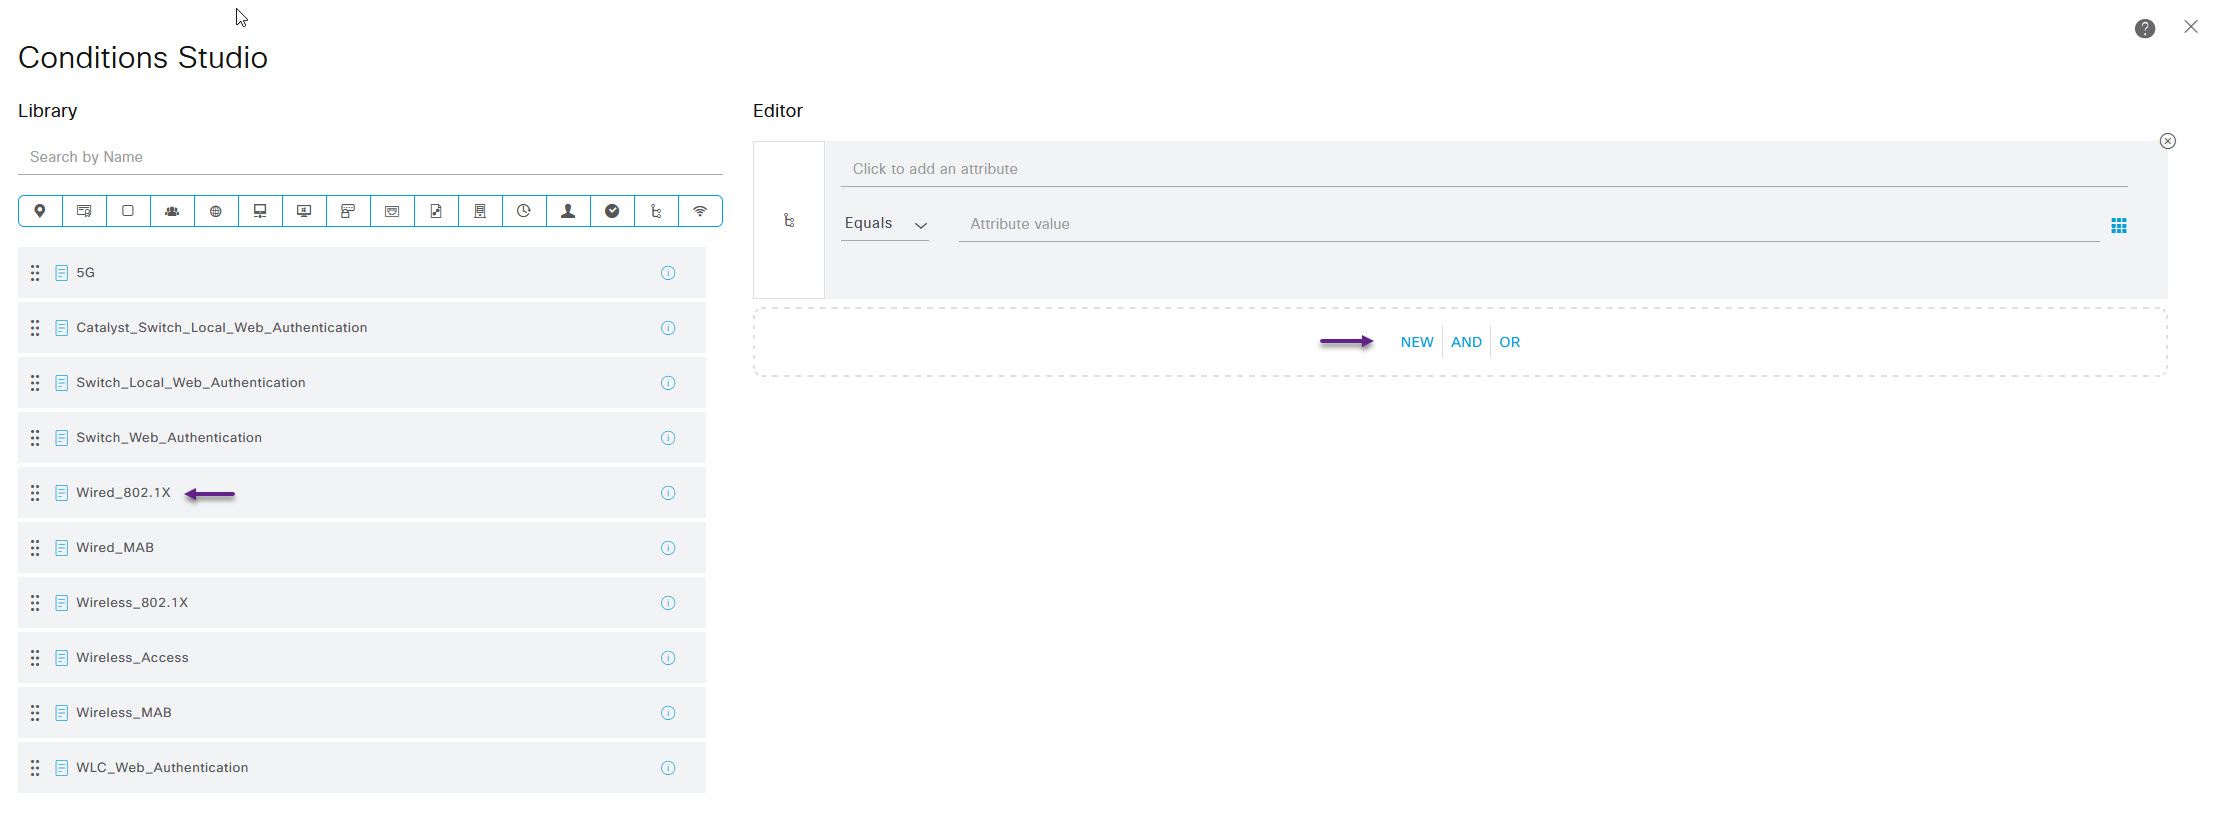
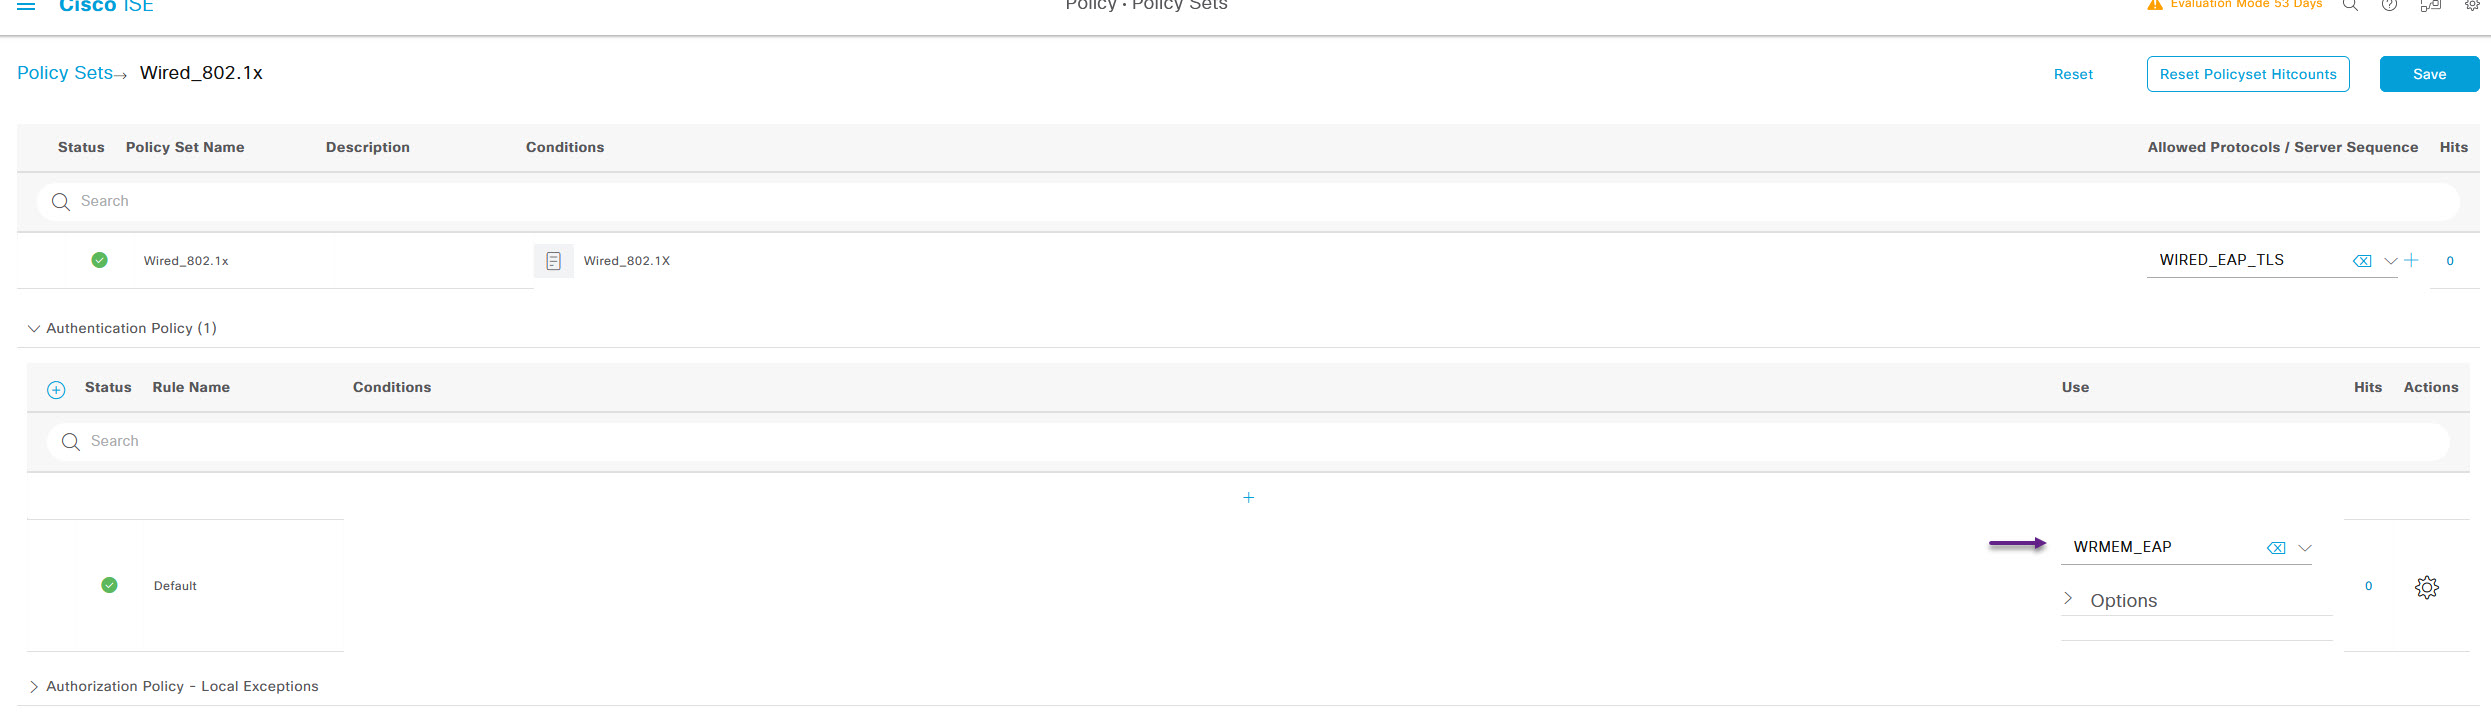
Scroll down to the bottom of the page and click Use. That will bring you back to the Policy Sets page. Click on the Save button, then click on the > arrow next to the new Wired 802.1x policy to edit the authentication and authorisation settings.
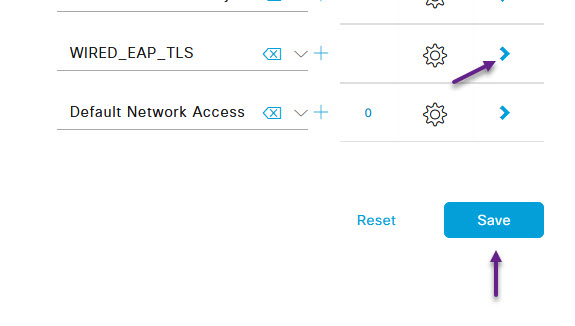
On the edit policy page, click the > to expand the Authentication Policy. Now there are many ways to configure the authentication policy, but the easiest way given this is for all Wired 802.1x authentication, is to use the Default policy and just change the Use option to the WRMEM_EAP certificate policy that we configured earlier. Select it from the drop down and click Save at the bottom of the page.
Once you've configured the authentication settings, it's time for the Authorization Policy, click the > to expand the Authorization Policy section. Once again, there are many ways to do this and you can configure all kinds of groups with VLAN assignments and DACL's etc but for now, I'm just going to create a new policy that matches on the User Group that we created earlier and allow access. To do that, click the Cog on the right of the Default policy and click Insert new row above.
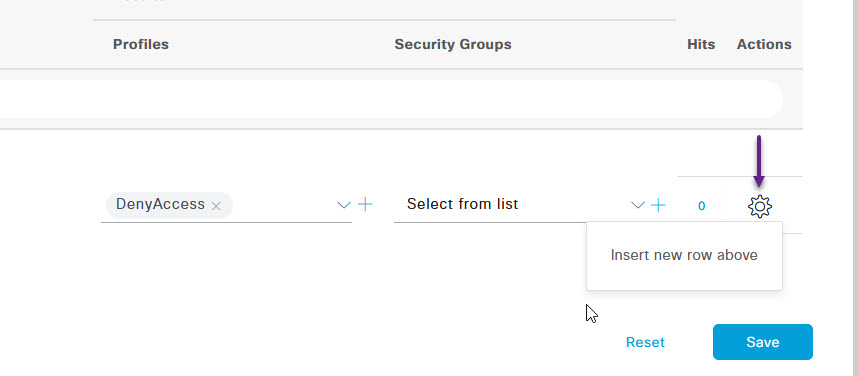
Give the policy a name by clicking in the Rule Name column, and from the Profiles list, select the default PermitAccess profile. Now click the + to edit the policy conditions.

On the Conditions Studio page, this time we're going to create a new attribute group for our specific Identity Group. Click the Click to add an attribute field, and from the Select Attribute for condition window, click the icon of a group of people, and scroll down till you see IdentityGroup Name and select that.
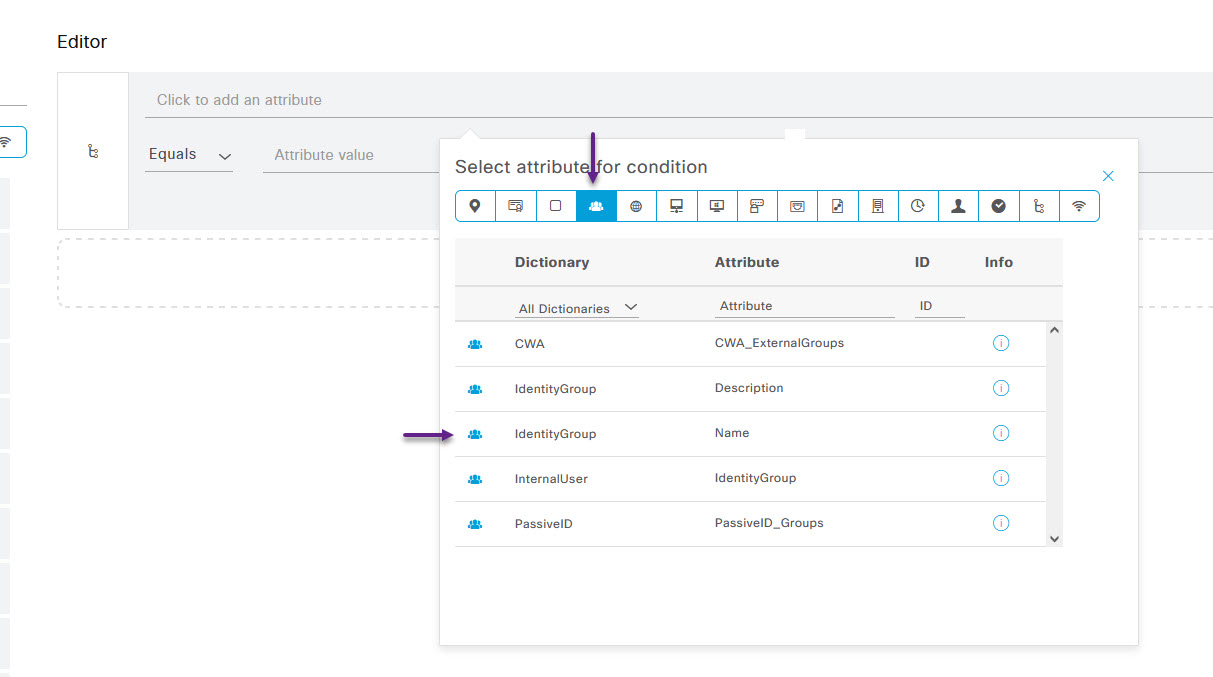
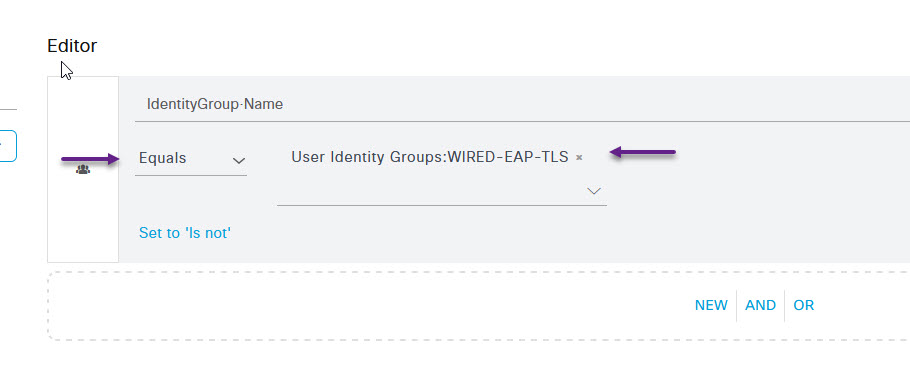
This will add the condition to the policy. Now select Equals from the drop down menu if it's not already selected, and select the Identity Group name from the drop down of the group that you want to match against in the Attribute Value field. Once done, scroll down and click Use.
And that's our policy configured. Scroll down to the bottom of the page, and click Save.
Now that the ISE configuration is completed. It's now time to move onto the Network Device configuration.
Switch Configuration
802.1x authentication requires a suplicant device which is kind of like a man in the middle device that communicates between the end user device and the Radius Server. In this lab i'm using a Cisco 3560x switch as the supplicant and I will need to enable 802.1x authentication. If you're using a Cisco switch, then the next step is to SSH into your switch. Once you're logged in configure a radius server as follows along with the additional radius server attributes that are required.
radius server WRLABISE01
address ipv4 10.10.10.10 auth-port 1812 acct-port 1813
key MySecret123

radius-server attribute 6 on-for-login-auth
radius-server vsa send accounting
radius-server vsa send authentication
With the radius server configured, you will need to enable AAA if you haven't already, and configure the required AAA authentication, authorisation and accounting commands for 802.1x. The below configuration creates a AAA 802.1x group called 8021XAUTH and configures the radius server group as 8021X.
aaa new-model
aaa group server radius 8021X
server name WRLABISE01

aaa authentication dot1x 8021XAUTH group 8021X
aaa authorization exec 8021XAUTH group 8021X if-authenticated
aaa authorization network 8021XAUTH group 8021X if-authenticated
aaa accounting dot1x 8021XAUTH start-stop group 8021X
With the AAA commands and Radius server configured, you need to enable 802.1x on the switch ports. Below is an example of an 802.1x configuration that will automatically assign a VLAN based on the ISE policy (I didn't go through how to do this in this guide, but you essentially need to create an authorisation policy and specifiy a VLAN in the policy and then add that to the authorization policy under the Policy Sets section)
interface GigabitEthernet0/1
 description PC 8021X
 switchport mode access
 authentication event fail action next-method
 authentication event server dead action authorize vlan 15
 authentication event server alive action reinitialize
 authentication host-mode multi-auth
 authentication order dot1x mab
 authentication port-control auto
 authentication timer restart 300
 authentication violation restrict
 mab
 dot1x pae authenticator
 dot1x timeout tx-period 10
 spanning-tree portfast
Alternatively, you can configure 802.1x and statically assign a VLAN on the port as follows.
interface GigabitEthernet0/8
 description PC 8021X
 switchport mode access
 switchport access vlan 10
 authentication event fail action next-method
 authentication event server dead action authorize vlan 15
 authentication event server alive action reinitialize
 authentication host-mode multi-auth
 authentication order dot1x mab
 authentication port-control auto
 authentication timer restart 300
 authentication violation restrict
 mab
 dot1x pae authenticator
 dot1x timeout tx-period 10
 spanning-tree portfast
And that's our switch configured.
User Certificates
Now lets move onto the user certificate configuration. If you've built your own PKI server then you will know how to create a user certificate, but if you've used my PKI build guide, i'll run through how to create one quickly here. SSH into your ICA server (Or CA server if you only built a CA) as the pkiadmin user. Once in, change to the ica folder under the pkiadmin homedir, and create a file called openssl_user_csr.cnf.
[pkiadmin@WRMEMPKI02 ~]$ cd ica
[pkiadmin@WRMEMPKI02 ica]$ vi openssl_user_csr.cnf
Below is an example configuration of the openssl_user_csr.cnf file. You will need to change the settings to suit your network and user requirements. I've specified the password in this configuration file but you don't have to. You can enter the password manually. Make sure if you do specify the password, you remember it.
[ req ]
prompt                  = no
distinguished_name      = client
default_bits            = 4096
input_password          = MySecret123
output_password         = MySecret123

[client]
countryName             = AU
stateOrProvinceName     = Queensland
localityName            = Brisbane
organizationName        = WR-MEM
emailAddress            = wr-mem1@wr-mem.net
commonName              = "wr-mem1"
Now run the below openssl req command, to generate the user CSR that will need to be signed by the ICA server.
sudo openssl req -out requests/wr-mem1.csr -newkey rsa:4096 -nodes -keyout private/wr-mem1.key -config openssl_user_csr.cnf

pkiadmin@WRMEMPKI02 ica]$ sudo openssl req -out requests/wr-mem1.csr -newkey rsa:4096 -nodes -keyout private/wr-mem1.key -config openssl_user_csr.cnf
[sudo] password for pkiadmin:
...+.........+.+..+....+.........+.........+...+...+..+.......+............+.....+...+.............+.....+....+...+........+...+......+...+...+.......+.....+......+.......+..+.......+++++++++++++++++++++++++++++++++++++++++++++++++++++++++++++++++*..+...+.......+..+....+..+++++++++++++++++++++++++++++++++++++++++++++++++++++++++++++++++*..+.........+......+....+...+......+......+...........+...+....+......+.................+..........+............+......+.........+.....+............+..........+........+.+......+......+..............+....+..+....+.....+.+..+.......+.......................+.......+.....+....+..+.............+.....+.+.....+...+............+...+..................+.............+.........+..+.+.........+...+..+...+...+.......+......+...........+...+......+.........+.......+.....+.+........+.......+...+...........+.+...+..+..................+.+...+.....+.......+........+...............+...+.......+............+.....+.+.....+...+.......+..+...+............+.............+........+.......+...............+..+.+..+...+....+...+...............+........+..........+..+..................+....+.....+.+..+.......+.....+............+.+..+..........+...............+..+.............+......+...........+...+................+.........+..+...+............+...+..........+..+......+...+......+.............+.................+++++++++++++++++++++++++++++++++++++++++++++++++++++++++++++++++
...+........+....+.....+++++++++++++++++++++++++++++++++++++++++++++++++++++++++++++++++*......+.......+..+...+....+.........+...........+....+......+...+..+...+......+.+..................+...+..............+...+.......+...+..+.+.....+...+....+...+............+...+.........+.....+....+..+...+..........+............+...+..............+...+++++++++++++++++++++++++++++++++++++++++++++++++++++++++++++++++*.+................+...........+.........+......+.+.........+...+...+.....+..........+..+.+..+....+.....+......+.......+......+......+......+........+.+........+...+......................................................................+...+.........+..+...............+.+++++++++++++++++++++++++++++++++++++++++++++++++++++++++++++++++
-----
Finally, with the user CSR created, you will need to sign it. (Note that I am using the freerad_user_cert extension in my openssl.cnf file as this one includes the extra bits required by Windows for 802.1x authentication. If you've used my build guide, then you will have these extra extensions already.
sudo openssl ca -config openssl.cnf -extensions freerad_usr_cert -notext -in requests/wr-mem1.csr -out certs/wr-mem1.crt

[pkiadmin@WRMEMPKI02 ica]$ sudo openssl ca -config openssl.cnf -extensions freerad_usr_cert -notext -in requests/wr-mem1.csr -out certs/wr-mem1.crt
Using configuration from openssl.cnf
Enter pass phrase for /home/pkiadmin/ica/private/ica.key:
Check that the request matches the signature
Signature ok
Certificate Details:
        Serial Number:
            86:71:e6:eb:ba:87:91:7a:82:a3:2e:3d:ba:1c:0e:d2:5b:b9:04:b0
        Validity
            Not Before: Jan 12 05:32:41 2024 GMT
            Not After : Jan 20 05:32:41 2030 GMT
        Subject:
            countryName               = AU
            stateOrProvinceName       = Queensland
            localityName              = Brisbane
            organizationName          = WR-MEM
            commonName                = wr-mem1
            emailAddress              = wr-mem1@wr-mem.net
        X509v3 extensions:
            X509v3 Basic Constraints:
                CA:FALSE
            X509v3 Subject Key Identifier:
                F4:45:EA:0B:51:93:62:A8:63:C3:60:D2:FB:41:50:D3:3C:64:24:D5
            X509v3 Authority Key Identifier:
                F5:0B:98:42:AD:2C:EC:59:8D:5A:FF:0D:1A:9B:D1:C4:B7:A7:7B:29
            X509v3 Key Usage: critical
                Digital Signature, Non Repudiation, Key Encipherment
            X509v3 Extended Key Usage:
                TLS Web Client Authentication
            X509v3 CRL Distribution Points:
                Full Name:
                  URI:http://crl.wr-mem.net/ica.crl.pem
Certificate is to be certified until Jan 20 05:32:41 2030 GMT (2200 days)
Sign the certificate? [y/n]:y


1 out of 1 certificate requests certified, commit? [y/n]y
Write out database with 1 new entries
Data Base Updated
[pkiadmin@WRMEMPKI02 ica]$
If you're using the certificates on a Windows machine, you will also need to convert them to pfx format which includes the private key. To do that use the following command. The password for this is the same password that you used to create the user certificate.
[pkiadmin@WRLABPKI02 ica]$ sudo openssl pkcs12 -export -out certs/wr-mem1.pfx -inkey private/wr-mem1.key -in certs/wr-mem1.crt -certfile ca-ica-chain.crt
Enter Export Password:
Verifying - Enter Export Password:
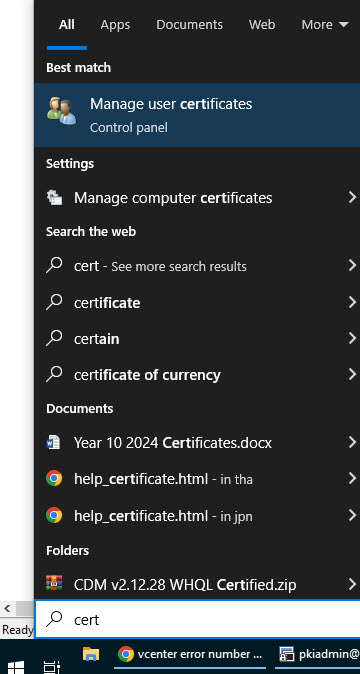
With the user certificate created, you will need to copy it to your device. Once copied, (if on Windows) click on the Start button and type in certificate. The search dialogue should bring up a Manage User Certificates application. Note that there is also a Manage Computer Certificates application but we want to manage user certificates for this install.
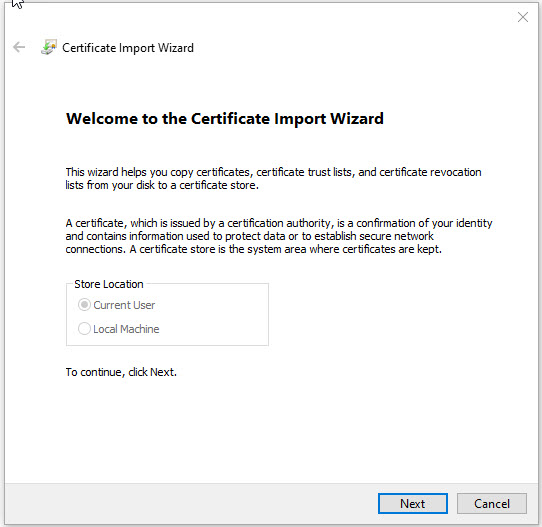
In the certmgr application, right click on Trusted Root Certification Authorities and select All Tasks -> Import.

On the Certificate Import Wizard first page, select Next.

Click on the Browse button on the next page and locate your CA certificate. Once selected, click Next.
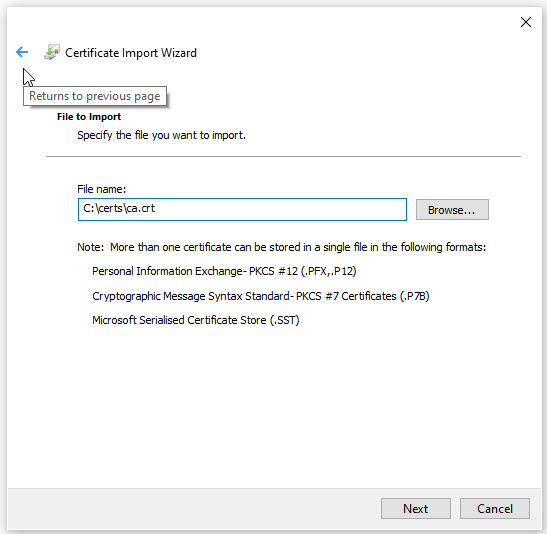
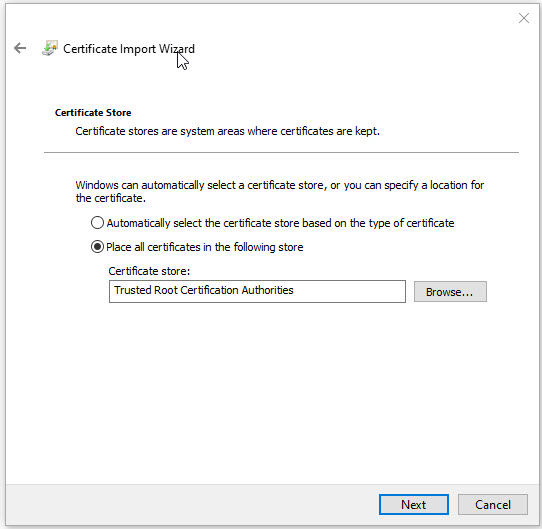
Leave the Certificate Store selection as default and click Next and on the last page, confirm the details and click Finish.
You will need to repeat this process for your ICA certificate under the Intermediate Certificate Authorities section in certmgr if you have an ICA.
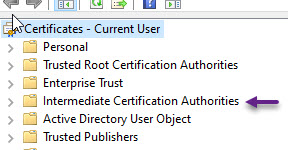
With the CA and ICA certificates imported as Trusted in the store. You will now need to import your user certificate. To do that, in certmgt, right click on Personal and select All Tasks -> Import.

On the first page of the Wizard, click Next
Click Browse and navigate to your user pfx certificate and click Next.
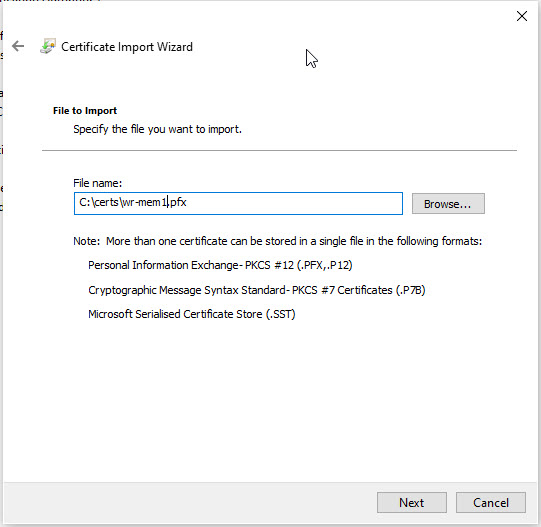
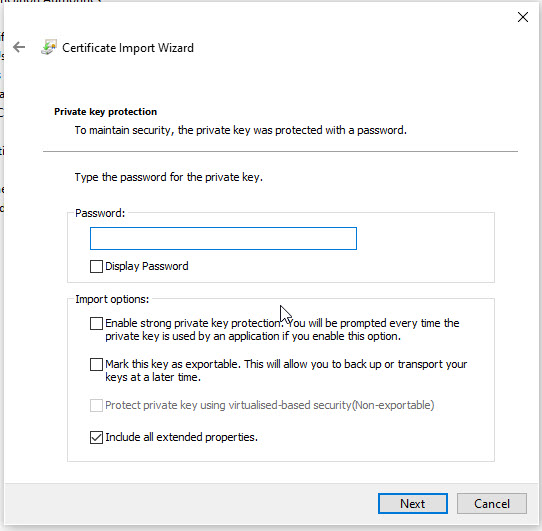
On the next screen, enter the user certificate password. This is the same password that you used to both create the user certificate and convert it to the pfx format.
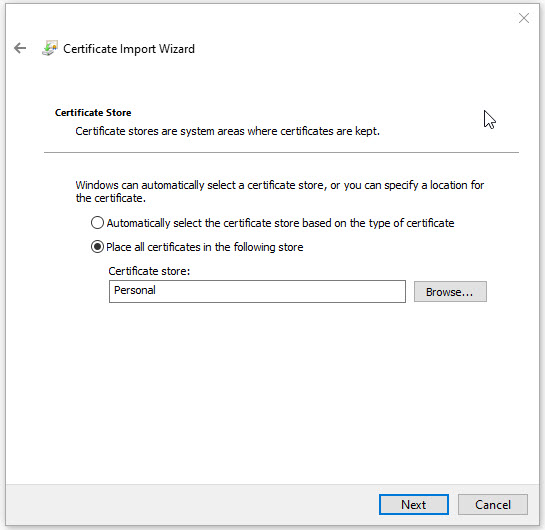
Leave the Certificate Store as the default, and click Next and the click Finish on the last page.
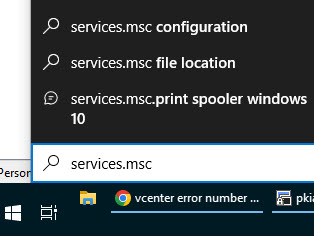
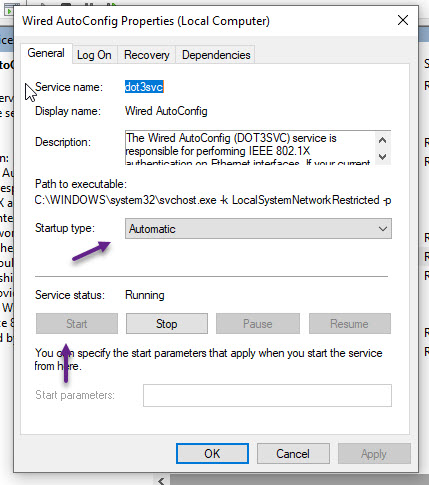
You should now have all the required certificates imported to your Windows PC. Now you will need to configure Windows for Wired 802.1x authentication. To do that first you will need to start the Wired AutoConfig service. Click the start button and type in services.msc and press enter
In the Services window, scroll down till your see Wired AutoConfig and right click on it and select Properties.

On the service properties window, select the Startup type as Automatic, and click the Start button to start the service. Once done, click OK and close the services window.
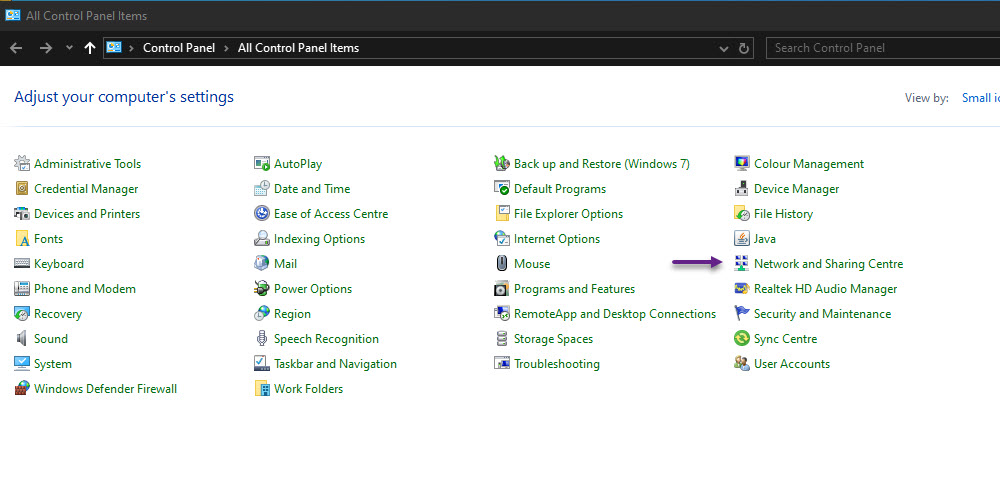
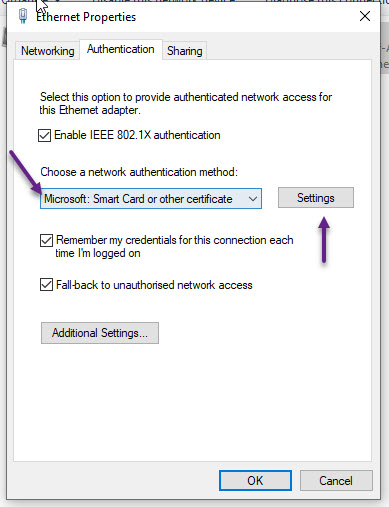
Now you will be able to configure Authentication under your Ethernet adapter settings. To edit the settings, open up control panel and then browse to Network and Sharing Centre.
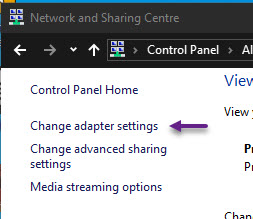
Click on Change adapter settings on the menu on the left.
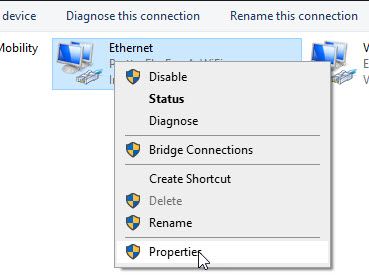
On the Network Connections window, right click on your Ethernet adapter and click properties.
Click on the Authentication tab and under Choose a network authentication method, select Microsoft: Smart Card or other certificate from the drop down and then click the Settings button.
Most of the settings should be okay by default but ensure that you have Use a certificate on this computer selected and Use simple certificate selection ticked as well. Also enable Verify the server's identity by validating the certificate. You can also enable the Connect to these servers tick box and specify a Server Name. This name should be the same FQDN name that is in the ISE EAP-TLS Server certificate. And lastly, under the Trusted Root Certification Authorities, scroll down the list till you find your CA certificate, and tick the check box next to it.
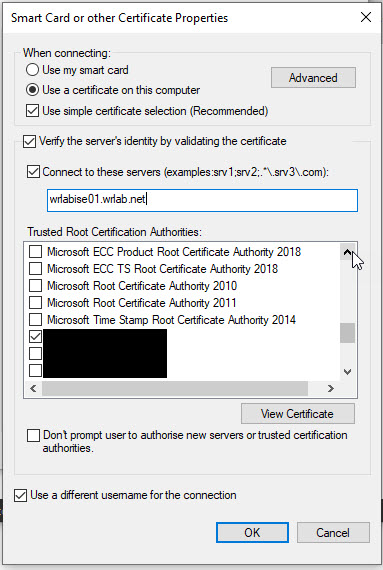
Once done, click OK, and OK again to exit out of all of the configuration setting and you're ready to go. You should now be able to connect your PC to an 802.1x enabled port and get access to the network. One thing to note is that if you experience issues connecting, on the Smart Card or other Certificate Properties window, you may need to set some of the Advanced options regarding certificate selection. Open the Advanced options and tick Certificate Issue and scroll down the list and tick the boxes that specify your CA and ICA server certificate. Once done click OK.
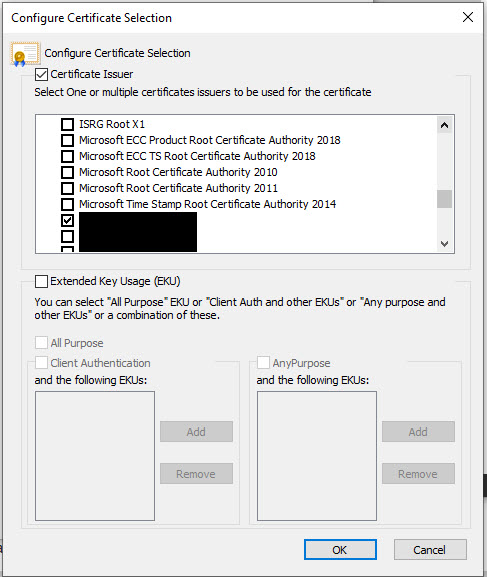
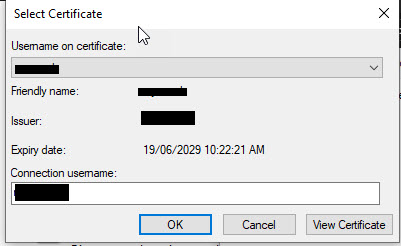
Note that if you have multiple user certificates installed on your PC and have selected multiple Certificate Issuer in the Advanced options you will be prompted to select a certificate to use to authenticate. Also make sure that you tick the Remember my credentials for this connection each time i'm logged in on the Ethernet Properties window.
And that's it. You should now be able to connect successfully using Wired 802.1x EAP-TLS authentication. You can verify that you have successfully authenticated using the ISE Radius logs and if you log into the switch are run the command sh dot1x interface g0/1 details you will see the status of the client as AUTHENTICATED.
WRLABSW01#sh dot1x int g0/1 details

Dot1x Info for GigabitEthernet0/1
-----------------------------------
PAE                       = AUTHENTICATOR
QuietPeriod               = 60
ServerTimeout             = 0
SuppTimeout               = 30
ReAuthMax                 = 2
MaxReq                    = 2
TxPeriod                  = 10

Dot1x Authenticator Client List
-------------------------------
EAP Method                = TLS
Supplicant                = 38c5.460a.32b0
Session ID                = AC10C702000002A650FC6327
    Auth SM State         = AUTHENTICATED
    Auth BEND SM State    = IDLE
If you've noticed anything missing or have any issues setting this up, please leave a comment and let me know.
Add new comment